AMD on Monday issued two patches for severe microcode security flaws, defects that AMD said “could lead to the loss of Secure Encrypted Virtualization (SEV) protection.” The bugs were inadvertently revealed by a partner last week.
The most dangerous time for this kind of security hole is right after it is disclosed and before patches are applied. Due to the nature of microcode patches, enterprise users now have to wait for OEMs and other partners to implement the fixes in their hardware-specific microcode.
“This places more burden on hardware vendor OEMs to distribute and install. That may cause a delay in adoption,” said John Price, CEO at Cleveland-based security firm SubRosa. “This could potentially create a gap. The speed of adoption might not be as quick as we would like to see.”
DeepSeek, founded in 2023 by Liang Wenfeng, a Chinese entrepreneur, engineer and former hedge fund manager, is generating a lot of buzz — and for good reason. Here are five things that make it stand out (as well as a listing of the latest news and analysis about DeepSeek).
DeepSeek offers:
More accessibility and efficiency: DeepSeek is designed to be less expensive to train and use than many competing large language models (LLMs). Its architecture allows for high performance with fewer computational resources, which is designed to lead to faster response times and less energy consumption.
Open-source availability and rapid development: DeepSeek is under active development with new models and features being released regularly. Models are often available for public download (on Hugging Face, for instance), which encourages collaboration and customization.
Advanced capabilities: reasoning and multimodal learning: Models like DeepSeek-R1 are designed with a focus on advanced reasoning capabilities, aiming to go beyond simple text generation. DeepSeek is expanding into multimodal learning, handling diverse input types such as images, audio and text for a more comprehensive understanding.
Limitations: Bias and context: Like all LLMs, DeepSeek is susceptible to biases in its training data. Some biases may be intentional for content moderation purposes, which raises important ethical questions. While efficient, DeepSeek could have limitations in handling extremely long texts or complex conversations.
Architecture and performance DeepSeek uses a “mixture of experts” architecture, employing specialized submodels for different tasks, enhancing efficiency and potentially reducing training data needs. DeepSeek has demonstrated competitive performance, comparable to established models in certain tasks, especially mathematics and coding.
Follow this page for latest news and analysis on DeepSeek.
The DeepSeek lesson -— success without relying on Nvidia GPUs
Feb. 3, 2025: During the past two weeks, DeepSeek unraveled Silicon Valley’s comfortable narrative about generative AI (genAI) by introducing dramatically more efficient ways to scale large language models (LLMs). Without billions in venture capital to spend on Nvidia GPUs, DeepSeek had to be more resourceful and learned how to “activate only the most relevant portions of their mode
Nvidia unveils preview of DeepSeek-R1 NIM microservice
Jan. 31, 2025: Nvidia stock plummeted after Chinese AI developer DeepSeek unveiled its DeepSeek-R1 LLM. Last week, the chipmaker turned around and announced the DeepSeek-R1 model is available as a preview NIM on build.nvidia.com. Nvidia’s inference microservice is a set of containers and tools to help developers deploy and manage gen AI models across clouds, data centers, and workstations.
Italy blocks DeepSeek due to unclear data protection
Jan. 31, 2025: Italy’s data protection authority Garante has decided to block Chinese AI model DeepSeek in the country. The decision comes after the Chinese companies providing the chatbot service failed to provide the authority with sufficient information about how users’ personal data is used.
How DeepSeek changes the genAI equation for CIOs
Jan. 30, 2025: The new genAI model’s explosion on the scene is likely to amp up competition in the market, drive innovation, reduce costs and make gen AI initiatives more affordable. It’s also a metaphor for increasing disruption. Maybe it’s time for CIOs to reassess their AI strategies.
DeepSeek leaks 1 million sensitive records in a major data breach
Jan. 30, 2025: A New York-based cybersecurity firm, Wiz, has uncovered a critical security lapse at DeepSeek, a rising Chinese AI startup, revealing a cache of sensitive data openly accessible on the internet. According to Wiz, the exposed data included over a million lines of log entries, digital software keys, backend details, and user chat history from DeepSeek’s AI assistant.
Microsoft first raises doubts about DeepSeek and then adds it to its cloud
How DeepSeek will upend the AI industry — and open it to competition
Jan. 30, 2025: DeepSeek is more than China’s ChatGPT. It’s a major step forward for global AI by making model building cheaper, faster, and more accessible, according to Forrester Research. While LLMs aren’t the only route to advanced AI, DeepSeek should be “celebrated as a milestone for AI progress,” the research firm said.
DeepSeek triggers shock waves for AI giants, but the disruption won’t last
Jan. 28, 2025: DeepSeek’s open-source AI model’s impact lies in matching US models’ performance at a fraction of the cost by using compute and memory resources more efficiently. But industry analysts believe investor reaction to DeepSeek’s impact on US tech firms is being exaggerated.
DeepSeek hit by cyberattack and outage amid breakthrough success
Jan. 28, 2025: Chinese AI startup DeepSeek was hit by a cyberattack, according to the company, prompting it to restrict user registrations and manage website outages as demand for its AI assistant soared. According to the company’s status page, DeepSeek has been investigating the issue since late evening Beijing time on Monday.
What enterprises need to know about DeepSeek’s game-changing R1 AI model
Jan. 27, 2025: Two years ago, OpenAI’s ChatGPT launched a new wave of AI disruption that left the tech industry reassessing its future. Now, within the space of a week, a small Chinese startup called DeepSeek has pulled off a similar coup, this time at OpenAI’s expense.
iPhone users turn on to DeepSeek AI
Jan. 27, 2025: As if from nowhere, OpenAI competitor DeepSeek has risen to the top of the iPhone App Store chart, overtaking ChatGPT’s OpenAI. It’s the latest in a growing line of genAI services and seems to offer some significant advantages, not least its relatively lower development and production costs.
Chinese AI startup DeepSeek unveils open-source model to rival OpenAI o1
Jan. 23, 2025: Chinese AI developer DeepSeek has unveiled an open-source version of its reasoning model, DeepSeek-R1, featuring 671 billion parameters and claiming performance superior to OpenAI’s o1 on key benchmark. “DeepSeek-R1 achieves a score of 79.8% Pass@1 on AIME 2024, slightly surpassing OpenAI-o1-1217,” the company said in a technical paper. “On MATH-500, it attains an impressive score of 97.3%, performing on par with OpenAI-o1-1217 and significantly outperforming other models.”
Hot on the heels of its launch of the o3-mini model last week, OpenAI on Sunday announced another component for ChatGPT that allows the generative AI (genAI) tool to do more in-depth research.
Described as “an agent that uses reasoning to synthesize large amounts of online information and complete multi-step research tasks for you,” deep research is now available to users on ChatGPT’s $200 per month Pro plan; Plus and Team plans are next in the queue to receive access, with Enterprise users following.
The agent is powered by a version of the upcoming OpenAI o3 model optimized for web browsing and data analysis, the company said, allowing it to search the internet, then interpret and analyze what it finds — whether it’s text, images, or PDFs — and pivot in reaction to what it’s found.
“Deep research is built for people who do intensive knowledge work in areas like finance, science, policy, and engineering and need thorough, precise, and reliable research,” OpenAI said in a blog post announcing the new capability. “…Every output is fully documented, with clear citations and a summary of its thinking, making it easy to reference and verify the information. It is particularly effective at finding niche, non-intuitive information that would require browsing numerous websites.”
OpenAI promises “significantly higher” rate limits than the current 100 queries per month once it releases a faster, more efficient version of deep research powered by a smaller model. It did not say when that would be available.
To use the tool, a ChatGPT user selects “deep research” in the message composer and then enters a detailed query. OpenAI says the user can add context by attaching spreadsheets or documents. As the query runs, a sidebar shows the steps deep research is taking, with the result displayed as a report in the chat. The blog provides examples of reports generated by deep research alongside those from GPT-4o to illustrate the way deep research combines information from multiple sources into a coherent whole.
Unlike a basic ChatGPT query, deep research takes its time generating that report — OpenAI says it takes from five to 30 minutes — and is very compute intensive. The company also admits that there are limitations to its accuracy.
“Deep research unlocks significant new capabilities, but it’s still early and has limitations,” the company said. “It can sometimes hallucinate facts in responses or make incorrect inferences, though at a notably lower rate than existing ChatGPT models, according to internal evaluations. It may struggle with distinguishing authoritative information from rumors, and currently shows weakness in confidence calibration, often failing to convey uncertainty accurately. At launch, there may be minor formatting errors in reports and citations, and tasks may take longer to kick off.”
Analysts were impressed, though with varying degrees of enthusiasm.
“I think what we are starting to see is a maturation of generative AI in the real world,” said Jason Andersen, vice president and principal analyst at Moor Insights & Strategies. “Initially, generative AI was trying to get some degree of momentum with the common user with diverse needs and questions. As internet users, we expect everything to be fast (purchases, searches, emails, etc). That became a design point for AI, since it was assumed that if a prompt just sat there for minutes, users would not use it. So, speed vs. depth ended up being a trade-off to get users on board.
“Interestingly enough, data scientists make this type of trade-off every day, but the typical user just expects a certain type of response,” he said. “But now we are starting to see the value in asking different things about AI. For instance, I use AI for market research versus content generation, so would I be willing to trade speed and content generation for a better research product? In my case, the answer is yes. But for an artist or designer or someone making blog posts, the answer could very well be no.”
“OpenAI’s deep research offering is compelling,” said Jeremy Roberts, senior research director at Info-Tech Research Group. “It’s a direct attempt to address the most common concerns about ChatGPT as it exists today: depth and reliability. By offering a product that is specifically designed to cite its sources and share its thinking, OpenAI addresses the criticism that its bot is unreliable and not suitable for real work. The examples they give are highly specific and technical and suggest that OpenAI is making headway in automating these specialized tasks to a greater degree than was possible with ChatGPT.
“The implications for professions are enormous,” Roberts said. “Many high-paying careers have paths that begin with basic research tasks. This can be true in finance and consulting. With a service like deep research, it may be difficult for people new to the labor market to build the necessary competencies and create a void as employers pivot away from trainee hires. This was always an issue with LLMs, but it seems like it might be accelerating. The labor market will have to respond.”
Deep research also heralds a change in model structure, Andersen noted. “The newer models are starting to be segmented, optimized, and tuned for different types of tasks,” he said. “The company that has been leading the charge here has been Anthropic, which has specific models for developing code and deeper research tasks. So, it’s interesting to see OpenAI do this as well.
“I think this will continue to be a trend, as we are also seeing other vendors head in this direction.”
US President Donald J. Trump’s tariffs on Chinese-made computing equipment are slated to go into effect tonight — but at a much lower rate than he initially threatened.
The 10% tariff will do much less damage than the 100% version that had been touted — and there are other factors that will mitigate its impact on enterprise IT budgets.
Ranjit Atwal , Gartner senior director analyst, has been modelling the likely evolution of PC prices this year. Even without the tariffs, he was forecasting average PC prices would rise by around 4% because of inflation and a move to AI PCs; those models typically include more expensive processors with neural processing units (NPUs) and a minimum of 16GB of memory to support generative AI (genAI) models running locally.
Effect of the tariffs on enterprise PC prices
The planned tariff is unlikely to add a full 10% to prices on top of the inflationary increase, he said. The supply chain is likely to absorb some of the increase in the form of narrower margins and still more by offering new PCs with lower specifications at lower price points. Without those kinds of measures, some have forecast demand for laptops in the US could fall by as much as 68%.
Overall, Atwal said, he expects average PC prices to rise by between 9% and 9.5% this year after taking into account inflation, changes in typical specifications, and the new tariffs.
Timing of the increases
Goods imported into the US or released from bonded warehouses there before 12:01 a.m. ET on Feb. 4 — or loaded aboard a ship bound for the US before 12:01 a.m. ET on Feb. 1, are exempt from the tariff. But anything arriving or shipping from China after those dates will be hit by the new tariff, according to Trump’s Executive Order and a fact sheet published by the White House.
Inventory already in the sales channel in the US is unaffected, but price increases on PCs will likely soon flow through to enterprises.
That’s because PC inventories are low at the moment, as sales have been slow and risk-averse resellers are reluctant to hold large stocks in case the introduction of newer models makes them obsolete, according to Atwal. He estimated there are perhaps 30 days’ PC inventory in the US channel.
Small share of IT spend
When the tariffs do start hitting IT equipment deliveries, the effect on already-stretched enterprise IT budgets might not be as pronounced because companies are now spending less on hardware and more on software and services.
“Three quarters of enterprise and government tech spend in the US comes from software and IT services,” said Michael O’Grady, a forecast analyst at Forrester Research.
Computer and communication equipment together make up just 13% of US technology spending, he said, “so although tariffs will impact the price of imported goods, most of the software and IT services spend would not come from China.”
Consequences for the rest of the world, too
While Trump can only impose tariffs on goods imported into the US, his order could have repercussions on IT equipment prices globally, too.
China produces about three-quarters of the world’s PCs, Atwal said, and there is little room for vendors to move production capacity away from China to avoid the tariffs — at least in the short term. “There has been a steady shift to other countries, but trying to rebuild that on the same scale somewhere else has not been straightforward,” he said.
There won’t necessarily be bargains available from vendors already making PCs and components in countries not subject to the tariffs, as the temptation for them will be to increase their prices across the board, just behind those hit with tariffs.
The US represents about 27% of the global PC market by units sold, Atwal said, so if demand here falls due to the tariffs, vendors will be looking to make up lost revenue from sales in other countries. How exactly they do that is one of the many unknowns: Will they raise prices to lift revenue, or cut them to boost sales volumes?
The tariffs Trump has imposed on Chinese, Mexican, and Canadian products could upset global trade ba;ances in other ways, too, Atwal suggested: The move could cause currency swings that will influence the cost of imported goods, including IT equipment in other countries.
With so many variables, he said, “We’re calculating this through. It’s not a straightforward exercise.”
As part of Microsoft’s big push into AI services, the company has created a new department called the Advanced Planning Unit (APU). Employees of the APU will, among other things, study the effects of AI on society and make recommendations about which products are worth investing resources in.
According to Silicon Angle, Microsoft is now looking for technologists, economists and psychologists who can contribute with their expertise.
Microsoft just last week created another AI department called Core AI — Platform and Tools. Its focus is on developing technical solutions for products such as Github Copilot.
Apple’s iPhone business isn’t just about new product sales. The second-user and services markets need to be considered, too. Not only does the company command the first market, but it continues to generate healthy services-related revenue on every iPhone used — an estimated $72 per user, per year, according to Morgan Stanley.
There’s little doubt the revenue generated by these services can help the company navigate challenging economic times, and it doesn’t matter if the device itself is first- or second-hand, so long as users sign up for services.
Gone but not forgotten
To get an idea of the scale of the second-user market, I turned to Circana. In data provided by B-Stock and Samsung Electronics America, I found that 11% of US consumers owned a purchased pre-owned device in 2024 as recession-wary consumers seek to acquire high-quality devices at prices they can afford.
IDC last year predicted that the used smartphone market will grow 5% a year — a stronger rate of growth than for new devices. It’s a global trend as acceptance of refurbished and second user smartphones grows.
It’s not just about money; consumers are increasingly aware of the link between electronic waste and the environment and choose devices that contribute to a more balanced circular economy.
That means the second-user market is very large. IDC estimates it was worth $72.9 billion in 2023, when more than 195 million used devices shipped. (It predicts 257 mllion used smartphones will ship worldwide by 2028.) That’s all smartphones, with the lion’s share coming from Apple and Samsung, reflecting demand in the new device market.
When it comes to new, “Apple and Samsung remained resilient amid strong flagship demand, reflecting the continued premiumization trend of the market,” said Sanyam Chaurasia, senior analyst at Canalys. “In the high-end, consumers are increasingly opting for the premium version of the flagship series, helped by vendors’ clearer differentiating models within their flagship series in an already price-inelastic segment. In Apple’s case, shipments of the 16 Pro and Pro Max in 2024 were 11% higher than the 15 Pro and Pro Max in 2023, reaching over 55 million units.”
B-Stock indicated that the second-user market also sees customers purchase the best available devices, relying on the growing availability of easy credit to do so.
What do people want?
Craig Feely, Samsung Electronics America’s Head of Certified Renewed/Trade-in, explains that when it comes to the secondary market, consumers care about price, battery life, and the residual value of the device. “Customers are looking more and more for an affordable smartphone option,” he said. “We design our products to be easily repaired or recycled.”
Citing data from Circana, Joe Dube, director for mobile accounts at B-Stock, recently explained that the current market is defined by about 30% of devices sold. That means for every 10 devices, just three reach the second user market.
“There’s room to grow,” he said. “There’s a ton of devices out there we want to get back into the circular economy.”
The economic benefits of second-user devices are clear. They enable consumers to access premium technology at a fraction of the original price. This affordability extends the lifecycle of devices, making technology accessible to a broader audience and reducing the financial burden on consumers.
At the Apple Store
It wasn’t terribly long ago that people purchasing new smartphones would primarily do so via their cellular provider. That’s no longer how it is. In the UK, for example, recent CCS Insights data shows more than 20% of UK consumers now purchase directly from Apple or Samsung, up from 5% in 2018. Apple’s online or high-street retail have become more popular destinations for new device purchases than carriers’ own shops.
It now appears that the secondary device market is arcing along the same trajectory, with B-Stock saying people increasingly prefer manufacturer trade-ins to those offered by carriers.
This benefits manufacturers, as it means they can pick up older devices at trade in, then recondition and resell them through their own outlets (such as Apple’s refurbished store) or via partners. That’s a good business, which — put bluntly — means Apple and Samsung get to sell the same device twice, generating additional income as they do.
Another thing that might be of interest to iPhone users: B-Stock’s data suggests November to be the very worst time to sell or trade-in an older iPhone, as that’s when the secondary market value of those devices declines at the steepest rate, 9.8%.
That decline I think reflects the introduction of new Apple devices, which always dent existing second user prices, not least because so many older devices are traded in at that time.
Why second-user smartphone sales are good for Apple
Not only does the second-user market act as a gateway through which a wider range of customers can begin to use Apple’s platforms, it also provides Apple with a strong opportunity to attract new customers to its high-margin services.
Increasingly, as shoppers choose to trade-in old devices for new, this also gives Apple a chance to renew and resell older iPhones, creating another income stream and adding a few more dollars to the actual revenue it realizes through new device sales.
Later, of course, the customer satisfaction levels Apple’s devices foster also suggests that those coming to its platforms via second-user channels will stay with Apple’s ecosystem in future, purchasing new hardware when they get the chance.
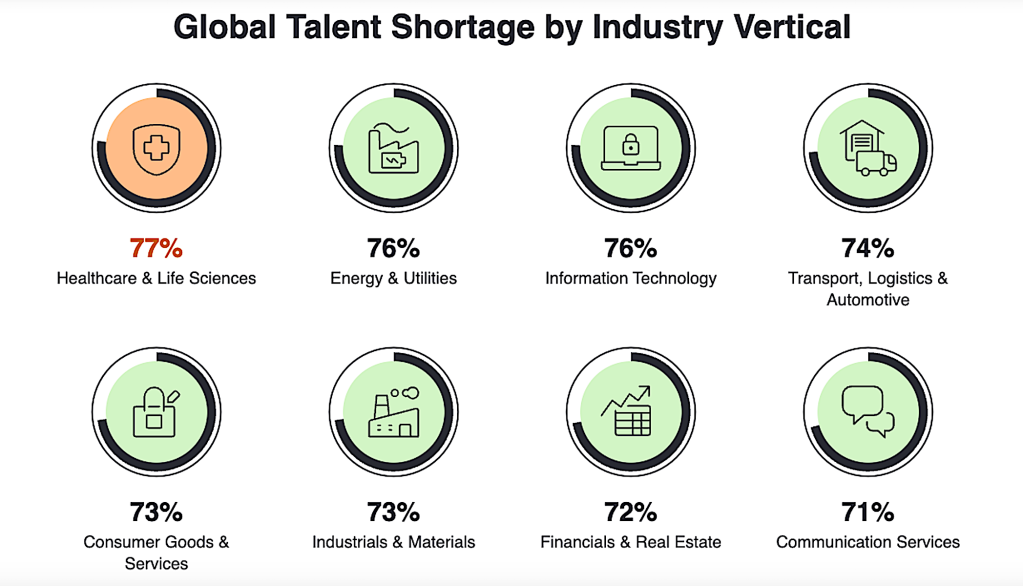
Seven out of 10 US organizations are struggling to find skilled workers to fill roles in an ever-evolving digital transformation landscape, and generative AI (genAI) has added to that headache, according to a new ManpowerGroup survey.
The AI skills gap is driven by the rapid growth of AI technologies and the increasing demand for adoption across industries, according to Kelly Stratman, Ernst & Young’s global ecosystem relationships enablement leader.
By 2030, companies are expected to spend $42 billion a year on genAI projects such as chatbots, agents, research, writing, and summarization tools. Currently, 50% of companies with over 5,000 employees use AI, with many more planning to do so.
Meanwhile, job postings for AI skills surged 2,000% in 2024, but education and training in this area haven’t kept pace, according to Stratman.
“As formal education and training in AI skills still lag, it results in a shortage of AI talent that can effectively manage these technologies and demands,” she said. “The AI talent shortage is most prominent among highly technical roles like data scientists/analysts, machine learning engineers, and software developers.”
As AI adoption spreads across industries, the skills gap is growing to include IT, cybersecurity, automation, and more, Stratman pointed out. To address the shortage, organizations must partner with AI leaders to access talent, training, resources, and technology solutions.
ManpowerGroup
A new survey by training platform Revature showed that 77% of US organizations have been negatively impacted by the IT skills gap, and 56% are choosing upskilling or reskilling as their biggest priority for closing that divide. More than eight in 10 decision makers (84%) are concerned about finding tech talent in 2025, and 57% of respondents said IT staffing companies can’t deliver talent quickly enough.
In Revature’s survey, 29% of respondents ranked AI, genAI, and machine learning as the most important hard skill out of seven capabilities. Data and analytics and cloud computing and infrastructure ranked second and third.
“While the majority of companies have been affected by the IT skills gap, it’s clear that IT and HR respondents have clear goals and priorities as we head into 2025 — but may not have the tools or the knowledge to execute them effectively,” said Revature COO Tan Moorthy.
Accenture reports that by 2027, 61% of workers globally will need retraining. While 94% are willing to learn new skills, only 5% of organizations are actively reskilling at scale. The demand for skills like AI, machine learning, and cloud computing is growing even faster.
A new report from Forrester Research indicated that in the age of AI, CIOs have to invest in three roles to stay competitive: AI developers and engineers, cloud-related roles, and data-specific roles such as data management and data engineers. The stakes are high. Forrester’s report states that 75% of firms building AI agentic systems in-house will fail, and 25% of AI projects will be stalled by implementation challenges.
A new study from freelance employment firm Upwork shows that 80% of executives prioritize skills over degrees when hiring, with half planning to boost freelance hiring this year to address gaps in AI and other skills. However, the skills needed, particularly for AI, are constantly evolving.
“The deepening threat landscape and rapidly evolving high-momentum technologies like AI are forcing organizations to move with lightning speed to fill specific gaps in their job architectures, and too often they are stumbling,” said David Foote, chief analyst at consultancy Foote Partners.
To keep up with the rapidly changing landscape, Gartner suggests that organizations invest in agile learning for tech teams. “In the context of today’s AI-fueled accelerated disruption, many business leaders feel learning is too slow to respond to the volume, variety and velocity of skills needs,” said Chantal Steen, a senior director in Gartner’s HR practice. “Learning and development must become more agile to respond to changes faster and deliver learning more rapidly and more cost effectively.”
Studies from staffing firm ManpowerGroup, hiring platform Indeed, and Deloitte consulting show that tech hiring will focus on candidates with flexible skills to meet evolving demands. “Employers know a skilled and adaptable workforce is key to navigating transformation, and many are prioritizing hiring and retaining people with in-demand flexible skills that can flex to where demand sits,” said Jonas Prising, ManpowerGroup chair and CEO.
Another wrinkle? Many organizations don’t have a clear idea of what skills their employees have.
Online learning platform Pluralsight recently surveyed 1,200 executives and IT professionals to explore AI’s impact and how organizations can prepare. The study showed that while AI adoption is speeding up, most organizations don’t know what AI skills their employees have or have a plan to upskill them. And with 81% of IT professionals stating they can leverage AI in their roles but only 12% reporting significant experience working with AI, it’s evident there’s a disconnect.
Last year, Accenture launched LearnVantage, a platform that enables organizations to discover what tech gaps they have and where to find online learning platforms to upskill employees. A recent partnership with startup Workera has provided Accenture with a worker skills evaluation platform that can be used by both employers and employees to measure their current skills status.
Kishore Durg, global lead of Accenture LearnVantage, said clients are worried about how technology will disrupt their workforce and are asking: How many people will be impacted, and where should they focus their learning to stay relevant?
“They’re all very focused on certifications. They want their people to be credentialed when they’re doing something. They’re all getting very, very picky,” he said. “And our clients are expecting employees to refresh their skills every three to six months.”
Organizations’ top priorities in reskilling or upskilling involve AI, cloud data, security, and full stack engineering, according to Durg. For AI, there are multiple skill domains that include regulation, security/privacy, optimization, initialization, tuning, and loss function. Within those domains are additional subcategories, such as AI model simulation.
The point? As more AI models are brought to market and others continue to evolve, the skills needed to develop and deploy AI are continually changing.
When discovered, however, the ROI can be significant. What may have taken four people to develop a marketing campaign can now be created with two or even one person using AI, Durg said. “We are seeing 40% to 50% increase in productivity within that field through the use of AI,” he said.
And workers who get certified in needed hard skills can earn an average of $10,000 more a year, according to online learning platform JobSkills.
“I think this process is very iterative. It has to continue to happen,” Durg said. “Assessments need to happen every year, because as technologies change, you have to keep refreshing yourself. The mindset needs to be one where you’re always open to learning new things.”