Page 50 of 125

Fix Windows with an in-place upgrade install

Sometimes a Windows installation simply goes off the rails. Menus don’t open properly, icons start moving around the desktop, File Explorer acts up, apps get weird, and so forth. Enough things can go wrong, or turn strange, that it’s important to understand various basic Windows repair strategies.

Over the past decade, one of the chief techniques in my own repair arsenal for Windows 10 and 11 has been what’s sometimes called an “in-place upgrade install” or an “upgrade repair install.” (Spoiler alert! This is absurdly easy to do in Windows 11 version 23H2 and later.)

Before going into the details of how to perform such a maneuver, let’s start with a definition and some explanation.

What is an in-place upgrade install?

An in-place upgrade install involves using the Windows OS installer to replace all the operating system files for Windows 10 or 11 on a PC. Basically, you’re using the installer’s setup.exe program to reinstall the same OS back over itself. This leaves user files entirely alone, retains many settings and preferences and, best of all, leaves already-installed apps and applications unchanged. It does, however, overwrite operating system files more or less completely. And in so doing, it often repairs a balky or misbehaving OS and returns it to normal, working condition.

It can take as little as 15 minutes to perform an in-place upgrade install. This maneuver doesn’t require much post-installation cleanup, tweaking, or follow-up activity, either.

Sounds too good to be true — what’s the catch?

Indeed, an in-place upgrade install can provide a quick and effective fix for many, many Windows problems and issues. I use this technique regularly, particularly when I notice that a system is starting to misbehave yet proves resistant to basic repair techniques, such as running the system file checker (SFC) or using the deployment image servicing and management (DISM) image cleanup capabilities.

But an in-place upgrade install is not a universal panacea, and it doesn’t work to cure all Windows ills, either. It is particularly powerless to reverse changes to the Windows registry. (That’s one reason why Microsoft advises users to steer clear or take a registry snapshot they can restore later if they must go where angels fear to tread.)

Here are some additional key considerations that determine the suitability of an in-place upgrade install for a Windows installation.

Requirements for an in-place upgrade install

  • You must be logged into an administrative account to perform an in-place upgrade install.
  • Windows 10 or 11 must be running (and keep running) so that you can run the setup.exe installer from inside Windows itself. You cannot run an in-place upgrade install using a bootable Windows installer or when Windows is booted into Safe Mode. (This is what’s called a “clean install,” and if you take this route, it does not save apps, applications, or any settings or preferences.)
  • You will need at least 9GB plus whatever disk space Windows is using on the drive where it’s running to perform an in-place upgrade install. That’s because the installer renames the running version to Windows.old and lays down a whole new Windows folder for the upgrade it copies to disk. That extra ~9GB or so is needed for work space during the install process.
  • The Windows installer you use must be the same edition (Home, Pro, Education, or Enterprise), the same language (for example, en-US for United States English, en-GB for British English), the same “bittedness” (32- or 64-bit for Windows 10; Windows 11 is 64-bit only), and the same build (or newer) as the Windows image it upgrades and repairs.

Post-installation checklist

Please note further that some cleanup or customization may be required once the in-place upgrade install has completed. You should check all these things, some of which may require some additional time and effort to complete:

  • Custom fonts and customized system icons will be absent following an in-place upgrade install. If you want them back, you’ll have to restore them manually.
  • Wi-Fi connections may need to be re-established (including providing SSIDs and passwords). Occasionally, networks may change from Private to Public and will have to be reset properly.
  • Windows Update will only be current as of the date of the image file used for the in-place upgrade install. All subsequent updates must then be applied from Windows Update to make the new installation completely current.
  • By default, Windows turns System Protection off. After an in-place upgrade install, System Protection must be turned on to enable capture and use of restore points if you want them.
  • The previous installation’s OS files in the Windows.old folder consume substantial disk space. Once things are working properly, run Disk Cleanup as Administrator to clear out those old files and recover the up to 35GB of disk space they typically consume. (You can see that folder represented in the WizTree disk space analyzer in Figure 1.)
windows.old folder highlighted on disk image in wiztree app

Figure 1: On a Windows 11 test PC, the Windows.old folder (outlined in white at top center) comes in at 34.7GB after an in-place repair install.

Ed Tittel / IDG

Once you’ve chewed through this list and pondered all the potential gotchas, performing an in-place upgrade install is easy — ridiculously so in Windows 11 and straightforward in Windows 10 with the right Windows ISO in hand.

Windows 11: Click one button to perform an in-place upgrade install

For versions 23H2 or later, you need only navigate to Settings > System > Recovery, then click the Reinstall now button next to “Fix problems using Windows Update,” as shown in Figure 2. It uses Windows Update for whatever version of Windows 11 you’ve got installed, matching the base version and installed updates exactly. It’s literally a one-button upgrade option.

windows 11 reinstall now button in system settings

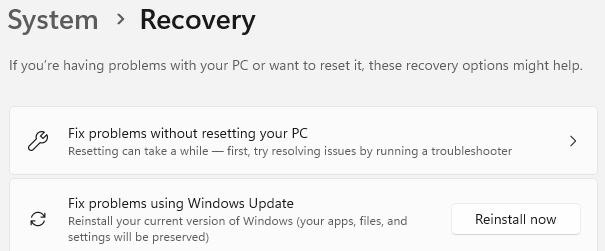
Figure 2: Click “Reinstall now” and Windows Update does the rest.

Ed Tittel / IDG

That said, this does take some time: I’ve had it take anywhere from 35 to 110 minutes to complete on various test machines. (Newer PCs with fast CPUs finished faster than older PCs with slower ones.) For that reason, Windows 11 users might wish to use the speedier ISO installation method described next, which also works for Windows 11 versions prior to 23H2 and for Windows 10.

Windows 10 or 11: Perform an in-place upgrade install from an ISO or USB media

An ISO, also called an “ISO image,” is a large single file that originally represented the contents of an entire optical disk — a CD, DVD, or Blu-ray Disc. This format is well-suited for installing a large, complex operating system such as Windows because it can bundle up all the programs, files, configuration data and so forth that go into installing such an operating system on a PC.

Windows 10 users can visit Microsoft’s Download Windows 10 page to grab its Media Creation Tool (MCT) for Windows 10. Running the MCT offers an option to build a Windows 10 ISO file. This approach works only for current versions of Windows 10, though. If you need something older (or newer, like a Windows Insider ISO) you may want to turn to HeiDoc.net’s Windows ISO Downloader or UUP dump instead. If you want to grab an ISO for Windows 11, you can head to Microsoft’s Download Windows 11 page or UUP dump.

Remember: the ISO you use to perform the repair install must match the version you’re trying to repair. Your running OS can tell you everything you need to know to pick an ISO for an in-place upgrade repair install. See Windows 10 Forums and Windows 11 Forum for details on how to elicit that info.

Once you’ve got the right ISO, you’ll need to do a little prep work before beginning the in-place upgrade process:

  • Be sure to log in to Windows with an administrative account.
  • If Windows runs on a drive that’s encrypted, you’ll need to suspend or turn off encryption before performing the in-place upgrade install. After the install completes, you can turn it back on again.
  • If the target PC runs UEFI (the Unified Extensible Firmware Interface), turn off fast boot and secure boot before starting the in-place upgrade install. Again, you can turn it back on after it’s done.
  • Disable or uninstall any third-party antivirus or security software that may be running (anything other than Windows Defender, in other words). Once again, you can reinstall or reenable it once the install is complete.

With that out of the way, running the repair install is dead simple:

  1. Mount the ISO.
  2. Navigate to the root of the virtual “CD Drive” into which the ISO’s contents get loaded.
  3. Run the setup.exe file.

If you’ve got a bootable USB medium (normally a flash drive), you can skip step 1. Open the drive in File Explorer and run setup.exe.

When the Windows installer gets going, accept the license terms, select Upgrade this PC now, allow updates, and click Next. Windows grabs updates, switches over to the installer OS image, and gets itself ready to run. You must then accept the license terms and allow the OS to start the actual in-place upgrade.

By default, the installer keeps all personal files and apps on the target machine. This is what you want, so there’s no need to dig into the “Change what to keep” item on the “Ready to install” page. Just be sure that both “Install Windows 10” (or “Install Windows 11”) and “Keep personal files and apps” are checked on that screen.

As the in-place upgrade runs, the circular progress indicator shows that it’s upgrading Windows, from 1% to 100%. Figure 3 shows the corresponding Windows 10 screencaps; Windows 11 screens are similar but not identical.

windows 10 screens - ready to install and installing windows 10

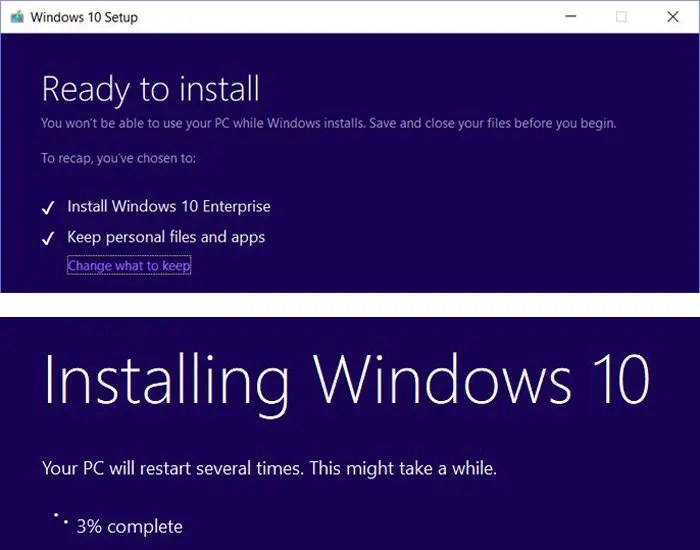
Figure 3: The Windows 10 installer prepares to resinstall the OS (top) and then grinds through the initial installation phase prior to the first reboot (bottom).

Ed Tittel / IDG

After that completes, the installer takes you through some additional setup screens where you have the option to customize settings or take the express route to completion. Once that is complete, you’ll sit through a number of colored screens as the installer puts the finishing touches on your in-place Windows 10 or 11 upgrade.

For the vast majority of PCs, it will take less than 20 minutes for this process to complete. Older, slower PCs may take half an hour or more, but that has not been my experience. This means that when an ISO is available, this process goes much faster than the simpler one-button Windows 11 option described in the previous section. I tend to prefer this for my Windows 11 repairs for that reason and because I keep current ISOs around as a matter of habit and choice.

After the installation

Please remember to check the list of items in need of possible attention and effort when the install is finished, as outlined earlier in the story.

By default, Windows keeps the Windows.old folder around for 10 days after such an install. If you’re sure things are working, you can remove it sooner. On the test Windows 11 PC whose Windows.old folder weighed in at just under 35GB in Figure 1, running Disk Cleanup (cleanmgr.exe) returned nearly 25GB worth of disk space, as you can see in Figure 4. That process took about 5 minutes to complete.

disk cleaner utility in windows 11 says it can clean up 24.4GB disk space

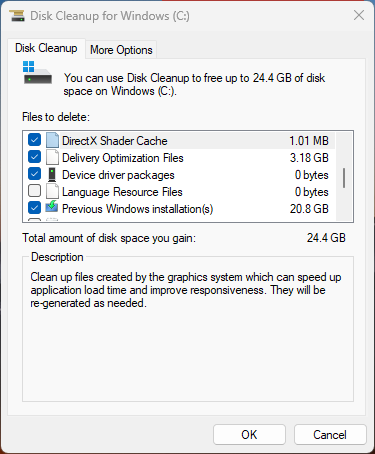
Figure 4: Disk Cleanup offers to recover 24.4GB on the repaired Windows 11 PC.

Ed Tittel / IDG

A strategy for using Windows in-place upgrade installs

Knowing that I can perform an in-place upgrade install quickly and easily has really changed my outlook on Windows troubleshooting. Except for hardware problems (or driver issues, which tie directly into hardware as well), if I find myself spending half an hour troubleshooting a Windows problem, I’m already asking, “Is it time for an in-place upgrade install?” Once that time spent stretches past one hour, there has to be a compelling reason why it’s not a good idea to perform an in-place upgrade install to keep me laboring away at other things.

Simply put, an in-place upgrade install is a great solution for resolving trying or opaque issues with Windows — as long as the target OS is still running well and long enough to run setup.exe through the first of the three or four reboots typical during Windows 10 or 11 installation. If you can make it to the first reboot, the new OS takes over after that anyway, and most problems will be fixed.

Over the past year, I’ve either experienced directly or read about an in-place upgrade install fixing a lengthy laundry list of vexing problems, including these:

  • Issues with system fonts, icons, thumbnails, and other presentation matters.
  • Networking problems with Wi-Fi and Ethernet, and with misbehaving or absent network interfaces.
  • Start and program menu issues, navigation and taskbar problems, and application window issues related to placement and sizing.
  • Flaky or erratic behavior from File Explorer, Edge, and UWP apps. Ditto for general OS instability (slow performance, unreliable system utilities, or frequent OS errors).
  • Otherwise intractable Windows Update issues (Windows 10 or 11 PCs can’t or won’t download or install updates or feature upgrades).

These days, if a Windows 10 or 11 problem proves hard to diagnose or fix, I’ll turn to an in-place upgrade install as a next or inevitable step in the troubleshooting and repair process. Much of the time, it provides the fix that’s needed. Savvy admins and power users could do worse than give it a try. Cheers!

This article was originally published in March 2018 and updated in November 2024.

The secret to summarizing notifications on Android

At this point, I think it’s safe to say the current wave of “AI everything” isn’t all it’s cracked up to be.

Let’s not sugarcoat it: The vast majority of generative-AI gobbledegook is unreliable, impractical, and more about marketing than any manner of real-world benefit for us — the (alleged) humans meant to be benefiting from it. But here and there amidst all the overhyped hullaballoo, a genuinely useful possibility pops up and peeks its way through the metaphorical curtain.

For some folks, that’s absolutely been the case with the AI-powered summarizing options appearing in apps and services across the tech universe these days. One click, tap, or spoken request — and boom: In a matter of moments, your favorite neighborhood AI genie starts summing up mountains of text and distilling endless-seeming info down into a succinct summary for you.

And if there’s one place where such a feat could be especially intriguing, it’s in our ever-overloaded Android notification panels.

With Apple already embracing the idea in its recently rolled out Apple Intelligence suite (for better or, erm, maybe for worse, in that scenario) and Samsung now supposedly considering something similar for its Android-based Galaxy gadgets, I’ve heard more than a few questions from my fellow Android-appreciating animals about if and how it’d be possible to have notifications automatically summarized here in the land o’ Android.

My friend, I’ve said it before, and I’ll say it again: On Android, where there’s a will, there’s a way.

Lemme show ya the secret.

[Psst: Grant yourself even more noteworthy notification powers with my new Android Notification Power-Pack — six smart enhancements that’ll change how you use your phone.]

How to summarize notifications on Android — no waiting required

If you want your Android device’s notifications summarized as they stream in — without any waiting for Samsung, Google, or anyone else to make such a feature officially available — a clever little app called Sum Up AI Notification Summary is the little-known key to making it happen.

And yes, ironically, the app’s name could do with some summarization — or at the very least a visit from the Department of Redundancy Department. But that teensy bit of amusement aside, it really is an incredible tool.

And it’s pretty easy to get going on whatever Android device you’re using, no matter who made it or how old it might be.

In fact, you’ve got just three key steps to consider:

Android notification summary step 1: Install and connect

First things first, install the Sum Up app from the Play Store (obviously — right?!). It’ll cost you a whopping $1.65, up front and in a single one-time payment. And it doesn’t require any disconcerting permissions or collect any form of personal data, as per its Play Store privacy policy.

Now, before we go any further: The app uses Gemini to handle the heavy lifting, and you have to connect it to your Google account before it can access that resource. It sounds complicated on the surface, but I promise you: It really isn’t at all difficult to do — provided you’re in an area where access to Gemini is generally available.

Here’s all there is to it:

  • Tap the box at the top of Sum Up’s main screen to get a Google Gemini API key. 
  • On the screen that comes up next, tap the button labeled “Create API key,” then tap the search box and select “Gemini API” (or any other option, really — it doesn’t actually matter!) in the list that shows up.
  • Tap “Create API key in existing project,” then tap the button to copy the key you’ve created.
  • Now, head back to the Sum Up app. Tap the “Gemini API key” line there, paste the key you just copied into that field, and tap “OK” to save it.

See? Told ya it wasn’t bad.

And Google won’t charge you a single penny for this privilege, either, within any normal-use scenarios — going all the way up to 15 requests per minute and 1,500 requests per day. (If you’re dealing with more notifications than that, you’ve got bigger fish to fry!)

Android notification summary step 2: Authorize and configure

Now that that part’s out of the way, you’ve just got a handful of relatively simple settings to make your way through before sitting back and enjoying your newfound Android notification summarizing powers.

Ready?

  • First, within that same main Sum Up setup screen, tap “Grant notification access,” then activate the toggle to allow the app to read and interact with your notifications (for what I hope are obvious reasons).
  • Head back to the setup screen and tap “Allow posting notifications,” then tap “Allow” on the prompt that pops up (again, for reasons that should be pretty apparent).
  • See the slider labeled “Messages threshold”? I’d slide that up to either two or three, to start. Otherwise, the system will summarize notifications even when there’s only a single message involved — and if you ask me, that isn’t really needed or helpful in any way.
  • And last but not least, flip the toggle next to “Retain original notification actions” into the on and active position. That’ll allow options like replying directly to a message or marking something as read to be present and available even on your summarized notifications.
Summarize notifications on Android: Sum Up AI settings
Setting up Sum Up to summarize your Android phone’s notifications is much easier than it looks at first glance.

JR Raphael, IDG

And that’s pretty much it! If you want, you can look through the “Per-app settings” option to see which specific apps Sum Up will watch and then summarize notifications from for you. It works with most email and messaging-oriented apps, including Slack, Google Messages, WhatsApp, and Gmail — but if there’s any particular app where you don’t want it to summarize, you can easily uncheck it in that area.

Summarize notifications on Android: Sum Up AI app selection
Sum Up lets you select exactly which apps you do — and don’t — want to see notifications summarized for.

JR Raphael, IDG

Take a deep breath and treat yourself to a quick crumpet break, if you’re feeling peckish. We’re almost done here — and your Android notification summary machine is basically now up and running.

Android notification summary step 3: Watch and adjust

At this point, all that’s left is to wait and watch as Sum Up works its magic.

I’d suggest keeping a close eye on the summaries for a few days and seeing what seems helpful vs. more annoying than valuable to you. You might find, for instance, that when it comes to regular texts, you prefer seeing every individual message from Google Messages by itself — but you might appreciate the summaries when it comes to notification-heavy work-related Slack conversations.

Android notification summary
Each of these notifications took three incoming Slack messages and summarized them into a single skimmable sentence.

JR Raphael, IDG

Whatever you decide, the power to make it happen is now firmly in your hands. And that, m’dear, is the power of Android — summed up as succinctly as can be.

Keep the customization coming with my Android Notification Power-Pack — six powerful new enhancements for your phone’s notification panel. It’s completely free!

Research: Extending corporate life of laptops by just one year can reduce harmful emissions by 25%

Extending the standard refresh cycle of laptops in a corporate environment can significantly reduce a workplace’s carbon footprint, according to new workplace sustainability research. However, challenges in ensuring the older laptops still meet Windows OS requirements, and other cost issues, could offset these environmental gains, experts said.

The Atos Sustainable Workplace report, published this week and aimed at providing insights to help improve corporate social responsibility, found that by refreshing laptops every four years rather than three, organizations achieve up to a 25% reduction in carbon and related emissions without downgrading device performance or user experience.

Moreover, by using what it called “data-driven, condition-based device refresh combined with remanufacturing,” organizations can even extend the life of laptops within an organization for eight to 10 years, according to the report.

Most (79%) of a laptop’s carbon footprint is produced during manufacturing, with each new device creating roughly 338kg of carbon dioxide equivalent (CO2e) before use, according to Atos. This means that extending the lifecycle of corporate laptops can have a huge impact on how sustainable a corporate environment is.

Atos research also found that 76% of large organizations’ laptops can be remanufactured — that is, stripped down and updated with newer parts where needed, and then sent back into the workforce — with the remaining 24% of devices available for refurbishment or recycling to contribute to the circular economy.

Moreover, the study found that employees are more than willing to use their older laptops longer for the sake of environmental benefits, with 75% of them saying they would be willing to keep them longer if it meant a more sustainable workplace.

Real-world issues to consider

Improving sustainability in a workplace is certainly a noble and, in the current global environment, even necessary goal. However, the vision Atos presents for extending laptop lifecycles to achieve environmental gains may not make practical, economic, or even cultural sense for current corporate environments, analysts noted.

One issue with the idea of keeping older laptops for longer is that Microsoft’s support for Windows 10 ends in less than a year. Most organizations are likely in the middle of a migration to Windows 11, which is challenging, as many older PCs may not meet the minimum requirements for the new operating system.

If organizations choose not to migrate, they may soon have to start paying for extended Windows 10 support, which starts at $61 per device in the first year, doubling to $122 per Windows 10 device in year two, and $244 per device for the third and final year.

Indeed, organizations are currently facing an important choice as the end of Windows 10 support looms: how do they want to approach either migration to Windows 11, or staying with older Windows 10 devices, noted Everest Group senior analyst Prabhneet Kaur.

“While component upgrades, like increasing RAM, can help meet Windows requirements, or informal workarounds may bypass them, maintaining robust security and a quality user experience will be tricky,” she said.

‘A lot of work for IT departments’

According recent Neowin numbers, overall share of Windows 10 users is currently at 60.95%, while the overall share of Windows 11 users is at 35.55%. These are consumer numbers; corporate environments often lag behind consumer adoption of new versions of Windows.

If an IT department wants to keep older laptops and migrate them to Windows 11, it will take both time and financial investment to maintain the older devices — neither of which corporate IT departments or budgets historically tend to have much of, another analyst noted.

“TCO [total cost of ownership] increases as the device gets older,” observed Ranjit Atwal, research director in Gartner’s Quantitative Innovation team, adding that remanufacturing laptops “sounds expensive to do every few years.” Overall, the idea of keeping older laptops in corporate circulation for a longer period of time “sounds like a lot of work for IT departments that don’t like change,” he noted.

Sebastien Vibert, solution manager at Atos, said his company’s analysis found that of tens of millions of devices observed, 96% of devices in large organizations are already compatible with Windows 11. This indicates that “a majority of corporate organizations have taken the necessary steps to refresh their devices, ensuring they meet the requirements for Windows 11” and thus support Trusted Platform Module 2.0, a critical hardware component of Windows 11 security.

Even if this is the case, there still remain “many challenges” to Atos’ vision of sustainability through laptop lifecycle extension, Atwal observed.

“There are lots of different parts of the organization to persuade to make the move to this type of sustainable path,” he noted. “However, sustainability is a major factor on the CIO agenda and these considerations are being discussed.”

Samsung in the lead as the smartphone market grows

Smartphone deliveries worldwide increased by 5% during the third quarter of 2024 compared to the same period a year ago, according to a new survey from analysis firm Canalys. That equates to about 310 million units and is the best performing third quarter for the smartphone market since 2021.

Canalys traces the growth to increased demand and an aggressive launch of several new products, including Samsung’s latest smartphone series and Apple’s iPhone 16 series.

During the quarter, Samsung maintained its lead in the market, taking 19% of sales, followed closely by Apple with 18% and Xiaomi with 14%. In fourth and fifth place were Oppo and Vivo, with 9% of the market each.

Canalys expects continued growth for the market through the end of the year.

How ChatGPT works with iOS 18.2 iPhones and Siri

Apple Intelligence has been available for a couple of weeks now, but the work continues. Apple recently pushed out the second iOS 18.2 developer beta, which reveals more about how ChatGPT integration will work with iPhones running Apple Intelligence.

As we’ve discussed, Apple has a three-strand approach to generative AI (genAI): The first strand consists of its own Apple Intelligence LLM models working on the device itself; the second is when it runs the same self-made models using secure servers in data centers; the third element is to offload to ChatGPT any requests Apple’s own technologies cannot handle. 

For users, the approach is quite seamless, though they can expect some kind of warning in the event an Apple Intelligence request must be handed to ChatGPT for completion. If they’re uncomfortable sharing the request with a third party — as some users in some industries should be — they can terminate the query before it’s passed along. The basic idea is that Siri will use ChatGPT to handle queries it lacks the ability or information to handle, particularly what Apple calls “world knowledge, such as recipes or information about locations. Siri handles the personal stuff.

But this much we already knew, so what’s new in iOS 18.2?

Free, but with limits

The arrangement Apple has made for using OpenAI means users can access ChatGPT for free, though if they already pay for the service, they can login with their own account.

There are, however, some limits to that free usage, as revealed in iOS 18.2 beta 2. The beta shows you can enable or disable the service completely if you choose. You’ll also find a new Advanced Capabilities section where you’ll be able to monitor use and check whether you are within the daily limit for access to its advanced tools. You might need to do so, as Siri could use ChatGPT when composing text or creating images. If you need more access, you can subscribe to ChatGPT’s premium service from the Advanced Capabilities item.

We don’t know if Apple takes a cut of that sale, but I imagine it must; if not, others selling services on the company’s platform would want the same deal. ChatGPT Plus ($19.99/month) benefits include access to more advanced LLM models and higher limits for photo and file uploads, image generation, web browsing, and more.

Also coming with iOS 18.2

The update will also see additional Apple Intelligence features, including Genmoji and Image Playground. The latter is visible in different parts of the system; when you highlight text in the Notes app, a new Create Image option appears that lets you use Image Playground to generate an image based on that text. Mail now categorizes incoming messages for you into different sections, including important “Primary” messages, a Transactions section, and Updates for newsletters and similar things. The Promotions category will capture all the special offer emails you just can’t get rid of.

You will be able to share Find My Location information with others. This could be useful if you are tracking down lost luggage, for example, or in the event you need to share the location of your stolen Apple device with law enforcement. The update also enables use of iPhone Mirroring when your device is connected to a shared hotspot with a Mac and an improvement to Camera Control which adds new auto-exposure and focus lock options for that button. But for many iPhone users, the big news will be support for use of the service in New Zealand, Australia, South Africa, Canada and the U.K.

If you are using an iPhone 16 you’ll gain a new Visual Intelligence tool, so that the iPhone can get information about whatever you point the camera at. The big AI highlight on Apple’s platforms for next year is currently the addition of contextual intelligence and on-screen awareness to Siri. Intimations of how this could work are visible in the current developer beta which lets Siri react to spoken commands that relate to in-app contents.

When will iPhones gain ChatGPT access?

Apple expects to enable ChatGPT integration via Siri in early December (Dec. 2?) when iOS 18.2 is expected to ship. Apple Intelligence is not expected to reach Europe until next year. But users in the EU will be able to console themselves with another new feature in iOS 18.2, which will allow them to select a different default browser on iPads and iPhones. EU users will also be able to define third-party default apps in a new section in Settings.

Please follow me on Mastodon, or join me in the AppleHolic’s bar & grill and Apple Discussions groups on MeWe.

Google Smart Lock / Extend Unlock: The complete guide

Think fast: How many times a day do you pick up your phone to look at something? Unless you live in the tundra or have far more self-control than most, the answer probably falls somewhere between “quite a few” and “more than any sane person could count.” Assuming you keep your device properly secured, that means you’re doing an awful lot of unlocking — be it with your face, your fingerprint, or the code you tap or swipe onto your screen.

And that’s to say nothing of the number of times you type your password into your laptop or enter your credentials into an app or website during the day. Security’s important, but goodness gracious, it can sure be a hassle.

Thankfully, there’s a better way. Google Smart Lock/Extend Unlock provides a variety of options for making it easier to access both your Android phone and your Chromebook in secure but simplified ways. It’s an easily overlooked but incredibly useful feature that lets you create a sensible balance between security and convenience.

What is Google Smart Lock? And what is Google Extend Unlock?

Google Smart Lock was an unlocking feature for Android devices and Chromebooks. Google has now, for no apparent reason, mostly changed its sensible Smart Lock name to the awkward and confusing “Extend Unlock.”

For clarity’s sake, we’ll use both terms in this story — partly because at this point nobody knows what Extend Unlock is, partly because Google itself can’t entirely seem to decide which name it wants to use where, and partly because Google has a long history of changing product and feature names willy nilly, so we wouldn’t be surprised if the company changes it back entirely to Smart Lock at some point.

In Android, Smart Lock/Extend Unlock allows you to keep your phone unlocked in certain preapproved, known-to-be-safe circumstances. In ChromeOS, it empowers your Android phone to keep your computer unlocked.

And best of all? Once you set it up in either environment, it couldn’t be much easier to use.

Here’s a step-by-step guide to activating Google Smart Lock/Extend Unlock and taking full advantage of everything it has to offer across both Android and ChromeOS.

Google Smart Lock/Extend Unlock for Android

On any reasonably recent Android device, you can set up Google Smart Lock/Extend Unlock to keep your phone unlocked in certain trusted situations but to require your PIN, pattern, password, or biometric authentication at all other times. It’s the best of both worlds, in other words: effective Android security without unnecessary annoyances.

To activate Google Smart Lock/Extend Unlock on Android, you’ll first need to have a PIN, pattern, or password set for your phone (which you should already have, regardless!). Then, in the standard Google Android setup — the setup you see on Pixel phones and certain other devices:

  • Open the Security & Privacy section of your phone’s settings.
  • On older Android versions, tap “Smart Lock.”
  • On more current and up-to-date devices, tap either “Advanced settings” or “More security & privacy” and then tap “Extend Unlock.”

On Android phones where the manufacturer has made modifications to the operating system, the Smart Lock/Extend Unlock section may be located in a different area of the device’s settings. On recent Samsung phones, for instance:

  • Open the Lock Screen and AOD section of your phone’s settings.
  • Tap “Extend Unlock.”

If you aren’t seeing the Extend Unlock option anywhere in your system settings, try tapping the search box or icon at the top of the main settings screen and then searching for that same term.

However you get there, once you’ve opened the Smart Lock/Extend Unlock section, you’ll be prompted to put in your PIN, pattern, or password — and you’ll then see a list of available choices:

On-body detection: Fire up this option, and your phone will remain unlocked whenever you’re holding or carrying it — so long as you’ve already unlocked it once. That way, if you unlock your phone to use it and then put it back into your bag or pocket while walking around, you won’t have to unlock it again the next time you pick it up. Anytime your phone is set down or not in motion for more than a moment, it’ll require authentication again.

Trusted places: Perhaps the most useful Google Smart Lock/Extend Unlock element, this option allows you to set specific locations — by business name, street address, or manual map placement — at which your phone will never put up a lock screen or require authentication (in theory, at least; the function can sometimes be a bit finicky and require occasional fine-tuning). You’ll obviously want to be selective about what places you choose, but configuring this to recognize somewhere like your home can be a helpful way to avoid authentication where it’s generally not needed but keep your phone secured in all other areas.

Trusted devices: If you’d rather have Google Smart Lock/Extend Unlock recognize a Bluetooth pairing, this next option’s for you. It empowers you to tell your phone to skip the lock screen anytime it’s connected to a specific Bluetooth device — say, your car’s audio system or your gym headphones — when you know the phone will always be in your control.

add trusted device screen in android

You can add any Bluetooth device that’s been paired to your phone as a trusted device and then let it keep your phone unlocked whenever it’s  connected.


JR Raphael / IDG

Google Smart Lock/Extend Unlock for Chromebooks

When it comes to ChromeOS, Google Smart Lock/Extend Unlock can keep you from having to type in your password every time your computer wakes from hibernation. It does this by turning your Android phone into a wireless key: Whenever your Android phone is nearby and unlocked, ChromeOS will skip the standard password entry screen and instead let you click a little arrow icon to sign in and get going.

Any reasonably recent Android phone will work for the purpose, though administrators do have the ability to disable the function in managed environments at businesses, schools, and other organizations. So if you’re in a company-oriented scenario and can’t find the option, that may be why. Your best bet is to ask your IT staff if it’s possible to enable it.

That asterisk aside, to get started with Google Smart Lock/Extend Unlock on ChromeOS, all you’ve gotta do is open up your Chromebook’s settings — by clicking the time in the lower-right corner of the taskbar area and then clicking the gear-shaped icon in the upper-right corner of the panel that pops up.

Next, click “Connected devices” in the main left-of-screen settings menu — and if you haven’t yet connected your Android phone to your Chromebook, click the “Set up” option within the “Android phone” section. Follow the steps to select and connect your device.

After a moment, you should see your phone’s name appear at the top of that same settings section. Click the right-facing arrow next to it and confirm that “Smart Lock” — which, for the moment at least, inexplicably still appears as Smart Lock and not Extend Unlock in this context (?!) — has its toggle in the on and active position.

google smart lock extend unlock feature on chromebook

Smart Lock, Extend Unlock, whatever you want to call it — once you connect your Android phone to your Chromebook, the option will appear.

JR Raphael / IDG

And that’s it: As long as Bluetooth is active on both devices, the next time your Chromebook is locked, you should be able to get into it quickly and effortlessly — without any of the usual patience-testing headaches.

Figure out which of these Google Smart Lock/Extend Unlock options make the most sense for you, and you’ll be able to achieve a sensible balance of security and convenience — and be well on your way to keeping your information safe while keeping your sanity intact.

This story was originally published in December 2018 and most recently updated in November 2024.

Europe plans to check Apple’s iPad for DMA compliance

It’s been a few weeks since EU regulators put pressure on Apple, but that brief reprieve is over as they begin an investigation that might affect Apple’s iPad in Europe. 

On the surface, it’s relatively straightforward. Apple’s iPad OS was declared to be a “gatekeeper” under Europe’s Digital Market Act earlier this year. The significance of this is that Apple is required to open up aspects of its operating system in order to foster the chimera of open competition, which might or might not benefit users.

“Apple must, among others, allow users to set the default web browser of their choice on iPadOS, allow alternative app stores on its operating system, and allow accessory devices, like headphones and smart pens, to effectively access iPadOS features,” the Commission said. 

Failure to meet those DMA requirements means the European Commission can fine Apple up to 10% of its annual global revenue (or 20% for repeat infringements), so the company is under serious pressure to get its response right.

What Apple has done is explained in a document

With that in mind, Apple has made or is making multiple changes to its tablet operating system, just as it has with iOS. The company has explained those changes in a compliance report it was forced to publish under European law. That 12-page document was released Nov. 1 and is available for review here.

In it, Apple stresses that some of the changes to the system bring greater risks to customers. Those risks include exposure to potential malware, fraud, malicious apps, and lack of support if a user is impacted by issues with apps downloaded outside of the App Store.

The company has attempted to protect against such problems by insisting that developers, including those selling apps outside the store, notarize their apps to provide some degree of protection. The report explains how it supports third-party stores, some of the limitations in that support, the tools it provides, and more, including some discussion around cost.

The report also confirms upcoming changes, some of which may be less well known, for example (most verbatim from Apple’s report):

  • In an update later in 2024, iOS and iPadOS will include the following updates to app deletion: the App Store, Messages, Camera, Photos, and Safari apps will be deletable for users in the EU. Only Settings and (on iOS) Phone will not be deletable. 
  • By the end of the year, Apple intends to introduce a secure solution for users to authorize developers to access data related to their users’ personal data (to the extent it is available to Apple and users have consented to their personal data being shared with the developer). 
  • Also scheduled for introduction by the end of the year, Apple is building a browser switching solution for exporting and importing relevant browser data into another browser on the same device. 
  • Apple is also developing a solution that helps mobile operating system providers develop more user-friendly solutions to transfer data from an iPhone or iPad to a non-Apple phone or tablet. Apple aims to make this solution available by fall 2025.
  • The company also suggests it will allow users in the EU to set default navigation and translation apps beginning in the spring of 2025.

Apple’s report confirms it has put a DMA Compliance team together to help maintain compliance with European law, and created a mediation process that’s independent and free of charge to developers following the company’s newly introduced appeals process for DMA compliance.

Now, Europe plans to check Apple’s homework

Now that Apple has shared its approach to compliance, EU antitrust regulators will take a look to make sure that approach meets the demands of the Digital Markets Act. While it sounds alarming, this also feels like a relatively normal step — Apple published its approach, and regulators will now assess it

In a statement, the European Commission said: “The Commission will now carefully assess whether the measures adopted for iPad OS are effective in complying with the DMA obligations.”  It will also consider input from third parties about Apple’s approach.

Hopefully during the review, regulators will work with Apple to rectify any identified lacks, but the Commission does warn that if it decides the solutions Apple has put forward are not compliant it will take “formal enforcement action as foreseen in the DMA.”

The way that is articulated somewhat suggests that the time for negotiation may be over, but, as Apple’s own report observes, “Apple has already announced changes to its compliance plan to address stated concerns which are being implemented across iOS and iPadOS.”

Apple has also hinted that Apple Intelligence will be introduced in Europe next year, which itself suggests some ongoing dialog. All the same, the kiss of death will be if Europe’s regulators choose to use the power they have to reduce the value of Apple’s platforms to end users, who already have a choice of platform to use.

Unfortunately, it seems the Apple-versus-regulation game will run and run.

Please follow me on LinkedInMastodon, or join me in the AppleHolic’s bar & grill group on MeWe.