As its long-running dispute with Arm turned into a war of words this week, the stakes for chip giant Qualcomm and its technology partners, including Microsoft, couldn’t be higher.
Along with MediaTek and Apple, Qualcomm is one of the biggest suppliers of chips for use in smartphones and tablets. As PCs, smartphones, and automobiles acquire more AI capabilities, the increasingly powerful Snapdragon Elite platform is supposed to be Qualcomm’s big move into those arenas.
Now the dispute with Arm, which has been rumbling on since 2022 over Qualcomm’s right to develop the ARM-based Oryon CPU core in its chips, threatens to derail the whole project. To clarify, ARM is the architecture, Arm is the company.
According to Bloomberg, and independently verified by PC World, Arm recently issued a 60-day notice of cancellation of Qualcomm’s Oryon license.
Disputes over intellectual property (IP) and licensing are common in tech, but the report garnered an unusually spiky response from a Qualcomm spokesperson, which suggests the confrontation might be more serious.
“This is more of the same from Arm — more unfounded threats designed to strongarm a longtime partner, interfere with our performance-leading CPUs, and increase royalty rates regardless of the broad rights under our architecture license.”
According to the spokesperson, the timing of Arm’s move was connected to an impending court date in December.
“Arm’s desperate ploy appears to be an attempt to disrupt the legal process, and its claim for termination is completely baseless. We are confident that Qualcomm’s rights under its agreement with Arm will be affirmed. Arm’s anticompetitive conduct will not be tolerated.”
Of course, it probably didn’t help Qualcomm’s mood that the news emerged smack in the middle of the company’s major Snapdragon Summit 2024, held in Maui this week.
Why does Oryon matter?
Qualcomm’s Snapdragon Elite platform comprises four system-on-a-chip (SoC) microprocessors aimed at different market segments: X Elite for Windows PCs, the 8 Elite for smartphones and tablets, the Elite Cockpit for automotive systems, and the Elite Ride for automated driving.
All use ARM-based cores in different configurations: the Oryon CPU as a general microprocessor, the Hexagon neural processing unit (NPU) to accelerate AI capabilities, and the Adreno graphics processing unit (GPU) for graphics.
It is the first of those, the Oryon CPU core originally acquired when Qualcomm bought Nuvia in 2021, that is at the heart of the dispute between the two companies. Arm claims that the agreement it had with Nuvia to develop Oryon did not transfer to Qualcomm, and that any agreements it had with Qualcomm were separate. Buying Nuvia didn’t alter this fact.
Could this affect business PCs?
The dispute is complicated by the involvement of Microsoft, which heads a list of PC makers using Qualcomm’s X Elite platform to push AI-enabled PCs.
That should be good news. After a long dip, the PC market has looked up in the last year, increasing 3.4% year-over-year in Q2 2024, according to figures from Canalys, the third quarter in a row to register growth.
Previous attempts to get Windows running on ARM floundered, but this time Qualcomm has made good with X Elite. Having decided that AI-enabled PCs are a new paradigm, Microsoft will want the dispute to be resolved as soon as possible.
The same goes for Qualcomm’s other PC partners, including Acer, Asus, Dell, HP, Lenovo, and Samsung, all of which have developed models using the same platform. In addition to Microsoft’s Surface Pro and Surface Laptop, models based on X Elite include Lenovo’s Yoga Slim 7x 14, HP’s OmniBook X, Acer’s Swift 14 AI, and various laptops in Dell’s XPS, Latitude, and Inspiron ranges.
All feature Copilot+, each promotes the claimed performance boost and hugely improved battery life of the X Elite, and most are at the more expensive business end of the price charts.
PCs with Intel and AMD processors also qualify as Copilot+ certified, so any failure to resolve the dispute, or defeat for Qualcomm, won’t disrupt AI capabilities from appearing in Windows laptops, but the Oryon core is also used in high-end smartphones and tablets due for release in the coming weeks.
The market assumption is that the companies will resolve the dispute before it reaches court, not least because of the uncertainty its continuation would create for both. That’s how numerous other licensing and IP disputes in tech end up being quietly forgotten.
That didn’t stop the pair’s share prices from taking a dive as news of the squabble’s latest development became public, a sign that some think this dispute is bound to hurt at least one of the companies.
During the pandemic, working from home was the order of the day at Ericsson. But as employees started to return, it was decided two years ago to have a 50 percent attendance in the office — a policy that was never really followed up, according to Jessica Nygren, vice chairman of the Swedish Association of Graduate Engineers’ local branch at Ericsson.
Now the company wants to see more people in the office, and at the end of the summer it announced a new policy: 60 percent attendance.
The company’s press officer Ralf Bagner described it as “a minor adjustment in the guidelines to increase clarity.”
“Today, Ericsson has a hybrid guideline based on the fact that we believe in the human encounter. We also believe that there should be a purpose to where an individual or team chooses to work. This results in an office-first mindset among managers and employees,” he said via email.
Jessica Nygren describes the change very differently.
“The decision came very suddenly, without warning, which meant that many managers took it straight at their word. Every day we see horror examples where managers state that employees should come in three days a week, full days. But it is stated in the policy that it is about 60 percent of the working time over a year, which makes a fairly big difference. To follow it to the letter strangles flexibility,” she said.
Rules without reason
Bagner wrote, “Ericsson’s hybrid guideline has always given every manager, employee and team the opportunity to work in dialogue on how and where they work best and that everyone understands the importance and benefits of meeting, from an individual and team perspective, and from a social and cultural perspective.”
But this is not what it looks like in practice, according to the union.
“We also believe that the company needs a greater presence in the office — developers need to brainstorm to find new products going forward — but no motive has been presented for us to use this particular model.
As it looks now, many are in a bind according to Jessica Nygren. Some of the employees come from other locations where Ericsson has previously had operations that have downsized or disappeared. They have then been offered a position in Kista but have remained in Örebro or Gävle. Now they are suddenly required to commute five, six hours a day, three days a week.
And when they arrive, the office may be full already.
“If you’ve been commuting for several hours, you want an adequate workplace: We’re supposed to be inside 60 percent of the time, but there are only seats for 50 percent of the staff, so you have to puzzle. In some places there is a lot of space left, in others not. Yesterday, for example, two of my colleagues sat in the toilet and took meetings because there was no room. Others go out and get in the car,” she says.
Not opposed
At the same time, Jessica Nygren emphasizes that the union is not against more people coming into the office, but that it is a process that should be allowed to take some time and be better adapted to different individuals.
“If we had been told that they wanted to increase the presence in the offices, we would have given the thumbs up. But then perhaps they should have announced that it would be launched after the turn of the year and that they took in feedback in the meantime. Are there parking spaces? What is commuting? How can we attract people — instead of with “push” as today, it would be better with “pull”.
Managers should also avoid having a harsh policy imposed on them and be able to decide what works in their particular work group, according to Jessica Nygren — someone may need to be in the office for more than three days while someone else can work more from home.
From the union’s side, however, they think they have a good dialogue with CEO Börje Ekholm, who has clarified in his weekly newsletters that “one size” does not fit all.
“Now the company management just has to get the other managers to understand it — as it looks now, the employees do not feel safe and they do not feel welcome in the office in cases where they are squeezed by the new policy,” says Jessica Nygren.
Even in today’s modern age, call center customer service continues to be a nightmare. Wait times can be long, customers get frustrated when caught in loops with limited and robotic chatbots, human agents are overworked and don’t always have the visibility into information they need, calls are dropped, information is lost … and the list goes on.
But AI agents are growing ever more sophisticated, showing promise in nearly every area of the enterprise, including customer service.
Cisco is angling to be a leader in AI-powered call center support, and Wednesday at its WebexOne 2024 event, it announced new Webex AI agents and assistants that will work alongside humans to streamline processes and address common headaches and snag points.
“In this age of AI, there’s one belief that we hold close to our hearts, and that is the value of human interaction,” Anurag Dhingra, SVP and GM of Cisco collaboration, said in a pre-briefing. “Experiences matter, and in fact matter more in the age of AI.”
AI helping humans
Over the last 18 to 24 months, Cisco has been working to improve the support experience for both customers and employees, said Dhingra. He pointed to a survey the company did with 1,000 customer experience leaders in 12 industries and 10 global markets. More than half of respondents (60%) said self-service isn’t working, and 60% also reported that human agents are overworked. Further, customer experience leaders reported that 1 out of 3 of those agents lack the customer context needed to deliver the best possible customer experiences.
“A lot of this is rooted in fragmented and siloed investments,” he said (indeed, 88% of respondents to the Cisco survey reported technology siloes).
Webex AI Agent, available in early 2025, will bring together conversational intelligence with generative AI to help improve self-service. Dhingra pointed out that, while customers want self-service, 55% avoid it because they find it “rigid and unhelpful.”
Existing AI bots “tend to be scripted, robotic, quite limited in what they can do,” said Dhingra.
The AI Agent platform will include a new design tool, AI Agent Studio, which allows contact centers to build, customize, and deploy voice or digital agents in minutes, choosing the model of their choice, Cisco said. This could help improve customer interactions and resolve issues more quickly and easily.
Dhingra pointed out that well-functioning self-service options can result in a 39% improvement in customer satisfaction (CSAT) scores. Furthermore, predicted Jeetu Patel, Cisco’s EVP and chief product officer, in the near future, 90% to 95% of customer calls will be handled by automated agents. But, he said, “it won’t feel like you’re talking to a robot, it will feel like you’re talking to a human being.”
Human interaction still critical
However, Dhingra pointed out, “there is no substitute for humans; sometimes customers need to talk to humans.”
AI Assistant for Webex Contact Center (to be generally available in Q1 2025) will work alongside humans to quickly supply information. New tools will include:
Suggested responses that appear directly in the platform.
Context summaries that help facilitate handoffs from AI to human agents. Necessary background information is included to get the human agent up to speed and eliminate the need for customers to repeat themselves.
Dropped call summaries: All interactions are captured and documented so that agents and customers can pick up where they left off when a call is resumed.
Automatic CSAT scoring based on data and transcripts of customer interactions.
In addition, to support overworked humans, Cisco plans to release an agent wellness platform that will schedule automatic breaks and shift which channels agents support to increase or decrease capacity based on need.
“It’s around helping humans,” said Dhingra.
Able to pivot, understand limitations
Prior to launch, Cisco is performing an internal pilot of Webex AI Agent in its human resources department. In a demo video shared by Dhingra, a worker interacted on her phone with an AI agent and asked the agent to book time off for her in Workday. The agent asked how many days off she was planning to take, and when, then booked it.
The worker then asked the AI agent to send her a new laptop, to which it replied: “I’m sorry but this is not something I’ve been trained on. I’m still learning as an AI agent, thanks for your understanding. If you need a new laptop, please contact your IT support team.”
This ability of AI to understand its limitations is critical, said Dhingra. “There are guardrails in place to stop it from going off rails.”
In the demo, the employee also interrupted the agent a few times, asking one question, then quickly switching to another. After a quick pause, the agent was able to switch gears. “[The employee] pivoted, asked about one thing, before an answer was given, she changed gears,” said Dhingra. “The AI agent was able to deal with that quite effectively.”
Further, he pointed out, the voice was “a lot more natural sounding, not as robotic as it has been in the past.”
Responsible AI ‘table stakes’
Responsible AI is top of mind for nearly every enterprise leader today, and Dhingra explained that Cisco has developed a set of principles it uses to review its AI systems, looking at transparency, fairness, accountability, reliability, security, and privacy.
The goal is to provide customers with information on how the models work and how they were trained, to “describe how the AI works under the covers,” he said. “We break down our responsible AI by use cases.”
Customers can also provide feedback that Cisco treats “just like security incidents,” he said. If a customer flags an issue, there is what he called an “urgent process in place” that will look into it.
“I do think this is table stakes for everyone right now,” said Dhingra.
Generative AI (genAI) is taking over the tech industry. From Microsoft’s genAI-assistant-turned-therapist Copilot being pinned to the Windows taskbar to Google’s Android operating system being “designed with AI at its core,” you can’t install a software update anymore without getting a new whizz-bang AI feature that promises to boost your productivity.
But, when you talk to AI, you’re not just talking to AI. A human might well look at your conversations, meaning they aren’t as private as you might expect. This is a big deal for both businesses working with sensitive information as well as individuals asking questions about medical issues, personal problems, or anything else they might not want someone else to know about.
Some AI companies train their large language models (LLMs) based on conversations. This is a common concern — that your business data or personal details might become part of a model and leak out to other people. But there’s a whole other concern beyond that, and it could be an issue even if your AI provider promises never to train its models on the data you feed it.
Want more about the future of AI on PCs? My free Windows Intelligence newsletter delivers all the best Windows tips straight to your inbox. Plus, you’ll get free in-depth Windows Field Guides as a special welcome bonus!
Why humans are reviewing AI conversations
So why are humans looking at those conversations? It’s all about quality assurance and spotting problems. GenAI companies may have humans review chat logs to see how the technology is performing. If an error occurs, they can identify it. Think of it as performing “spot checks” with feedback from human reviewers then used to train the genAI model and improve how it will respond in the future.
Companies also review conversations when they suspect abuse of their service. It’s easy to imagine that the companies could also use AI tools themselves to dig through the masses of chat logs and find ones where there seems to be some sort of problem or a safety issue.
Tools like OpenAI’s ChatGPT and Google’s Gemini are being used for all sorts of purposes. In the workplace, people use them to analyze data and speed up business tasks. At home, people use them as conversation partners, discussing the details of their lives — at least, that’s what many AI companies hope. After all, that’s what Microsoft’s new Copilot experience is all about — just vibing and having a chat about your day.
But people might share data that’d be better kept private. Businesses everywhere are grappling with data security amid the rise of AI chatbots, with many banning their employees from using ChatGPT at work. They might have specific AI tools they require employees to use. Clearly, they realize that any data fed to a chatbot gets sent to that AI company’s servers. Even if it isn’t used to train genAI models in the future, the very act of uploading data could be a violation of privacy laws such as HIPAA in the US.
For many knowledge workers, it’s tempting to give ChatGPT a big data set of customer details or company financial documents and have it do some of that informational grunt work. But, again, a human reviewer might see that data. The same is true when these tools are put to personal use.
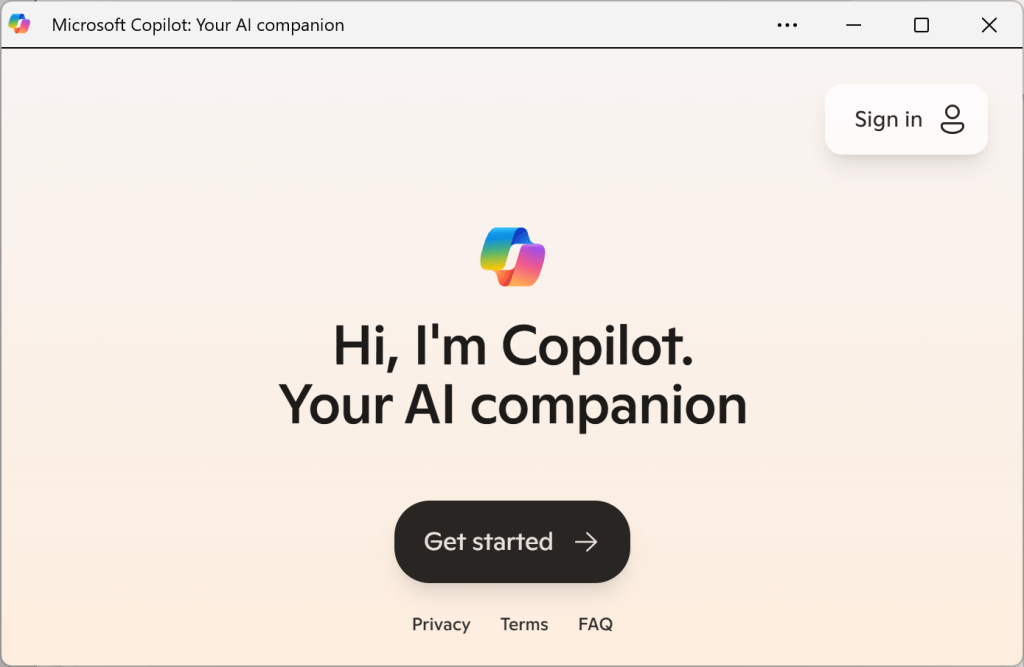
Humans may review your conversations with Microsoft Copilot.
Chris Hoffman, IDG
Do ChatGPT, Copilot, and Gemini use human reviewers?
To be clear, all signs suggest humans are not actively reading the vast majority of conversations with AI chatbots. There are far too many conversations to make that possible. Still, the main genAI tools you’ve heard of do at least occasionally use human reviews.
For example:
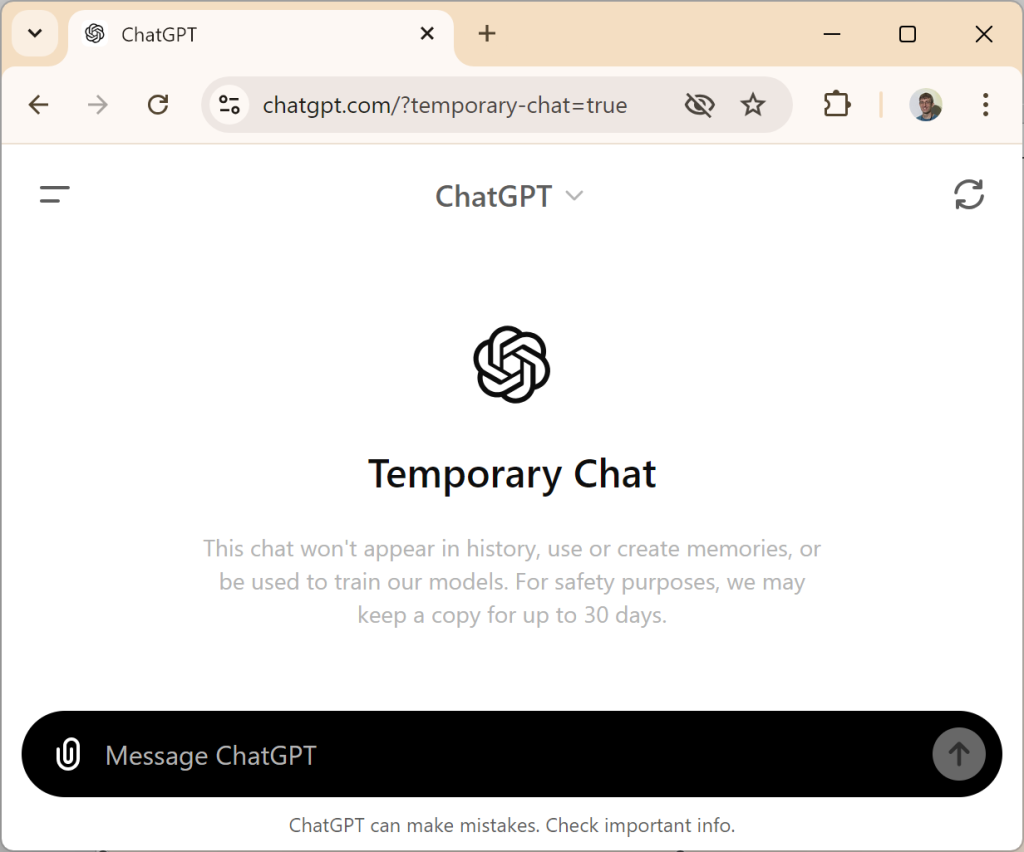
ChatGPT lets you turn off chat history by activating a “temporary chat.” With chat history on, the conversations will be used to train OpenAI’s models. With a temporary chat, your conversations won’t be used for model training, but they will be stored for 30 days for possible review by OpenAI “for safety purposes.” ChatGPT’s Enterprise plans provide more data protections, but human reviewers are still involved at times.
Microsoft says Copilot conversations are also reviewed by humans in some situations: “We include human feedback from AI trainers and employees in our training process. For example, human feedback that reinforces a quality output to a user’s prompt, improving the end user experience.”
Google’s Gemini also uses human reviewers. Google spells it out: “Please don’t enter confidential information in your conversations or any data you wouldn’t want a reviewer to see or Google to use to improve our products, services, and machine-learning technologies.”
ChatGPT’s Temporary Chat option provides more privacy, but humans may still review some of your conversations.
Chris Hoffman, IDG
How to ensure no one is reading your AI conversations
Companies that need to safeguard business data and follow the relevant laws should carefully consider the genAI tools and plans they use. It’s not a good idea to have employees using a mishmash of tools with uncertain data protection agreements or to do anything business-related through a personal ChatGPT account.
In the long run, AI models that run locally could prove to be the ideal answer. The dream is that an AI chatbot would run entirely on your own computer or mobile device and wouldn’t ever need to “phone home.” Companies could run their own AI software in their own data centers, if they so chose — keeping all of their data entirely under their own control.
Despite all the criticism of Microsoft’s Recall tool, which will let you search through your Windows 11 desktop usage on a Copilot+ PC when it launches, Recall had the right idea in many ways. It will do everything on your own PC without sending things to Microsoft. Human reviewers won’t see it.
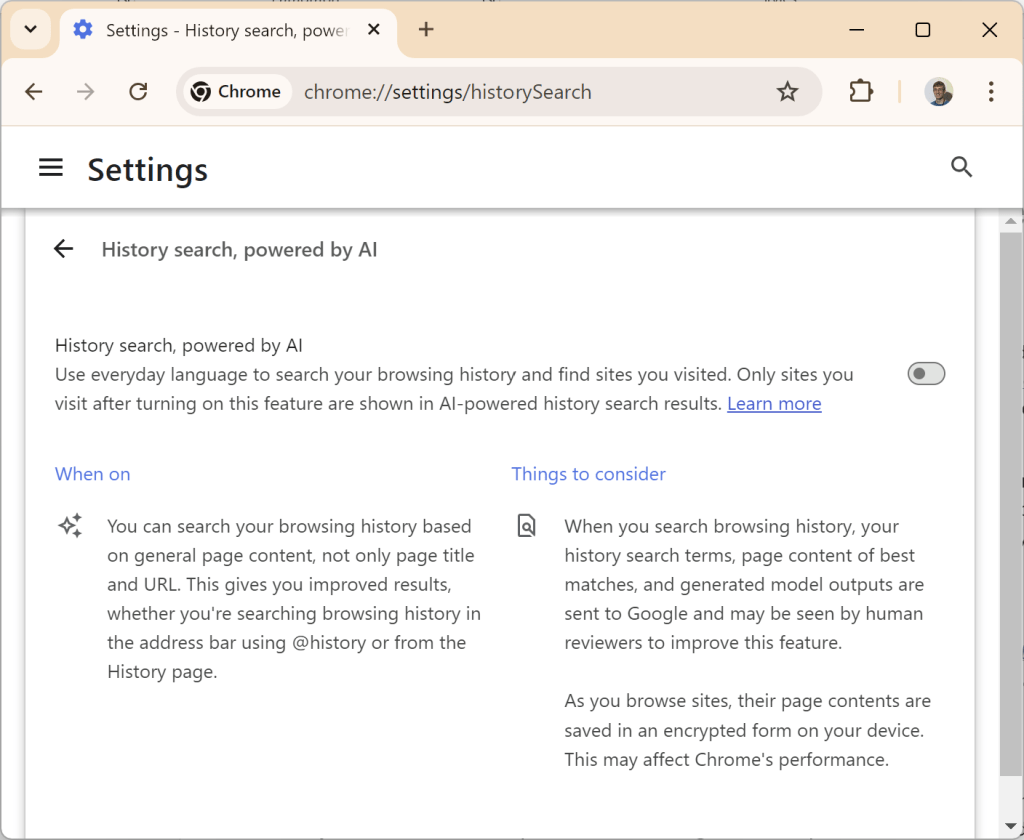
On the flip side, Google recently launched AI history search for Chrome — and, again, human reviewers might examine your browser history searches if you try it out.
Google warns that humans may see your browsing history if you turn on AI history search in Chrome.
Chris Hoffman, IDG
Two sides of the AI-human question
Let’s come back to earth. I don’t mean to be Chicken Little here: The average person’s ChatGPT conversations or Copilot chats probably aren’t being reviewed. But what’s important to remember is that they could be. That’s part of the deal when you sign up to use these services. And now more than ever, that’s something critical for everyone to keep in mind — from businesses using AI professionally to people chatting with Copilot about their hopes and dreams.
Let’s stay in touch! My free Windows Intelligence newsletter delivers all the best Windows advice straight to your inbox. Plus, get free Windows Field Guides just for subscribing!
Oh — hi there! Sorry for the slightly nonsensical greeting. I’ve been thinking a lot about keyboards this week, y’see, and how that trusty ol’ QWERTY surface has evolved in our lives.
Also, saying “QWERTY” over and over again is surprisingly fun to do. Go ahead and try it. I’ll wait.
Back? Cool. So, about that QWERTY contemplation: ‘Twas a time not so long ago that our QWERTY interactions on the mobile-tech front revolved almost entirely around actual physical keys. (Drooooooid, anyone?) Then, even when we started relying on on-screen QWERTY surfaces, we were hunting and pecking and doing an awful lot of correcting.
I remember when Google bought out a now-forgotten promising Android keyboard project called BlindType. BlindType’s entire premise was that it was smart enough to figure out what you were trying to type, even when your fingers didn’t hit all the right letters.
The concept seemed downright revolutionary at the time — which is funny now, of course, ’cause that feels like such a common and expected feature in the land o’ Android keyboards. But my goodness, have we come a long way.
These days, you can absolutely type like a clumsy caribou and still see your thoughts come out mostly the way you’d intended. You can seamlessly switch between tapping and swiping, too, and you can even speak what you want to write with surprisingly decent reliability (…most of the time).
But when it comes to Google’s Gboard keyboard, your options for intelligent text input don’t end there. In addition to its many useful shortcuts and shape-shifting form choices, Gboard has some out-of-sight options for advanced text interactions that’ll save you time and make your days significantly easier.
They aren’t things you’ll use all the time, in place of the now-standard sloppy-tappin’, wild-swipin’, and hopeful-speaking methods. Rather, they’re specific tools you’ll use alongside those other Android text input options — like smart supplements for the especially enlightened among us.
Check ’em out for yourself and see which of these Gboard goodies are either new to you or maybe just gems you’ve gotten out of the habit of using.
First up is a super-handy way to import text from the real world and then use it as a starting point for whatever it is you’re typing.
It’s all too easy to overlook or forget, but Gboard has a simple built-in trick for snagging text from a monitor, document, or anything else around you and then importing it directly into your current text field.
Just find the icon that looks like a document with arrows on its corners — either in Gboard’s top row or in the menu of options that comes up when you tap the four-square menu button in the keyboard’s upper-left corner. (And remember: You can always change what’s in that Gboard top row by touching and dragging any icons in that full menu area and placing ’em in whatever position you want.)
Tap that bad boy, point your phone at the text in question — and hey, how ’bout that?!
Scanned words, in a text field and ready — with precisely three taps in Google’s Gboard Android keyboard.
JR Raphael, IDG
You’ve got words from the real world right in front of you — ready to write around or edit as you see fit.
Gboard Android trick #2: Write right
Few mere mortals realize it, but in addition to tapping, swiping, and talking, you can also enter text into any field on Android with some good old-fashioned handwriting on your fancy phone screen.
It’s an interesting option to keep in mind for moments when you feel like your own scribbly scrawling might be more efficient than any other text input method.
This one takes a little more legwork to get going the first time, but once you do that, it’ll never be more than a quick tap away:
First, head into Gboard’s settings by tapping the four-square menu icon in the keyboard’s upper-left corner and then tapping the gear-shaped Settings option in the full Gboard menu.
Select “Languages” followed by the Add Keyboard button. Type “English (US)” (or whatever language you prefer), then make sure “Handwriting” is active and highlighted at the top of the screen.
Tap the Done button to apply the changes.
Now, make your way to any open text field to pull up Gboard, and you should be able to either press and hold the space bar or hit the newly present globe icon next to it to toggle between the standard keyboard setup and your snazzy new handwriting recognition system.
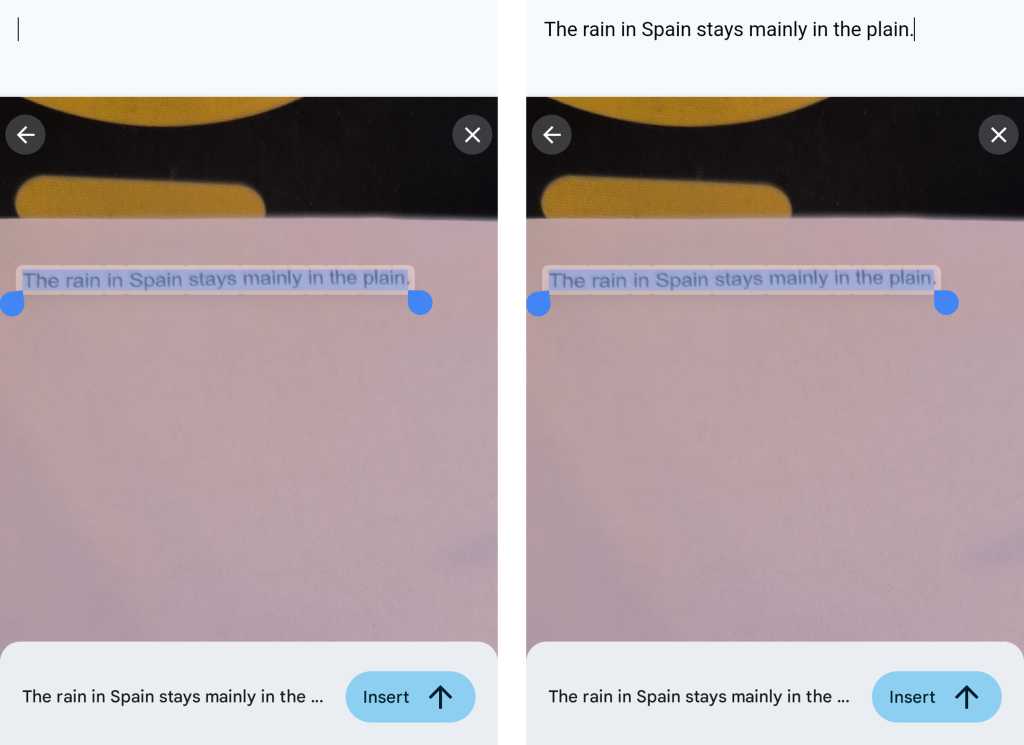
And once you’ve got that handwriting canvas open, all that’s left is to write, write, write away and watch Google’s virtual genie translate your illegible squiggles into regular text almost instantly.
As you can see above, it works even if your handwriting resembles the harried scrawls of a clumsy caribou. (No offense intended to my caribou comrades.)
Gboard Android trick #3: Quick clips
One of my all-time favorite Gboard tricks is the keyboard’s intelligent integration of the Android system clipboard — and some incredibly helpful tricks that come along with that.
Look for the clipboard-shaped icon either in the keyboard’s top row or within the main Gboard menu to get started. The first time you tap it, you might have to activate the system (via the toggle in the upper-right corner of its interface) and also grant Gboard permission to access your system clipboard. You may also need to mosey back into the Gboard settings to find the “Clipboard” section and enable all the options there to get every piece of the puzzle up and running.
Once you do, though, good golly, is this thing amazing. It’ll automatically show every snippet of text and any images you’ve copied recently, for one-tap inserting into whatever text field you’re working in — and it’ll show your recently captured screenshots for the same purpose, too.
Gboard’s clipboard integration makes it easy to find anything you’ve copied and insert it anywhere.
JR Raphael, IDG
Perhaps most useful of all, though, is the Gboard clipboard’s capability to store commonly used items and then make ’em readily available for you to insert anytime, anywhere. You could use that for email addresses, physical addresses, Unicode symbols, snippets of code, or even just phrases you find yourself typing out often in Very Important Work-Related Emails™.
Whatever the case may be, just copy the item in question once, then pull up the Gboard clipboard and press and hold your finger onto the thing you copied. Tap the “Pin” option that pops up, and poof: That text (or image) will be permanently stored in the bottom area of your Gboard clipboard for easy retrieval whenever you need it.
Pinned items in the Gboard clipboard are like your own on-demand scratchpad for easy inserting anywhere.
JR Raphael, IDG
As an extra bonus, Gboard also now syncs your pinned clipboard data and continues to make any pinned items available on any Android device where you sign in.
Gboard Android trick #4: Your personal editor
When you’re banging out a Very Important Business Email And/Or Document™ on your phone, it’s all too easy to mix up a word or inadvertently accept an errant autocorrect. We’ve all been there — and all had the same ducking reaction — right?
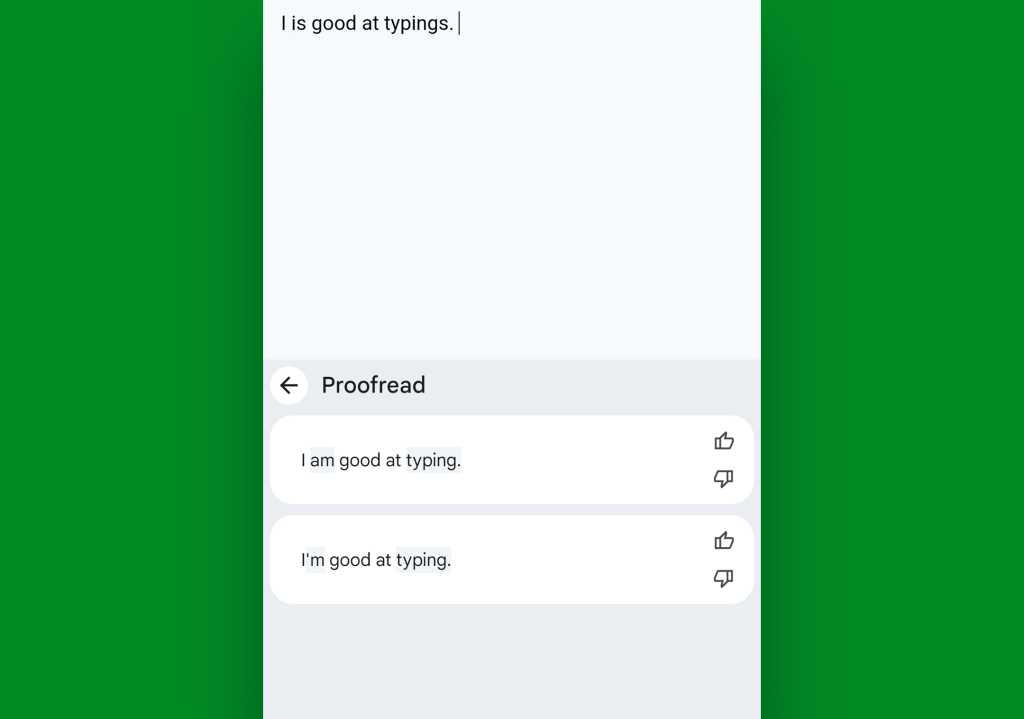
You may not always have a second set of human (or even caribou) eyes to look over your words whilst composing on the go, but Gboard’s recently added proofreading feature can at least give you some second layer of assurance before you hit that daunting Send button.
To find it, tap the four-square menu icon in Gboard’s upper-left corner and look for the Proofread button — with an “A” and a checkmark on it.
Tap that bad boy and tap it good, and in a split second, Gboard will analyze whatever text you’ve entered and offer up suggestions to improve it.
Need a quick confirmation that your text makes sense? Gboard’s proofreading feature’s got your back.
JR Raphael, IDG
Not bad, Gboard. Not bad. You is clearly the one who is gooder at typings today.
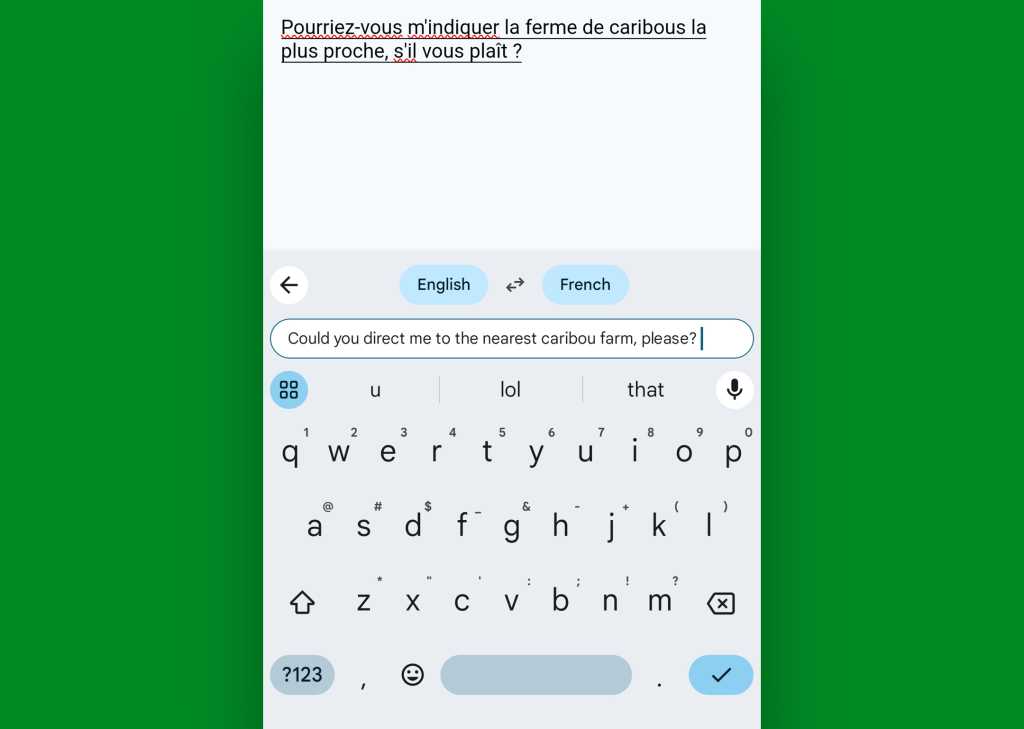
Gboard Android trick #5: The translation station
Last but not least in our text input improvement list is a serious time-saver and communication-booster, and that’s the Gboard Android app’s built-in translation engine.
Hit that four-square menu icon in your keyboard’s upper-left corner once more, find the Translate button, and tap it — then select whatever languages you want and type directly into the Gboard translate box.
Gboard will translate your text in real-time and insert the result, in whatever language you selected, directly into whatever text field you had selected.
Any language, anytime, with Gboard’s on-demand translation system.
JR Raphael, IDG
Pas mal, eh?
Keep all these advanced input tricks in mind, and you’ll be flyin’ around your phone’s keyboard like a total typing pro — with or without a caribou at your side.
Get six full days of advanced Android knowledge with my free Android Shortcut Supercourse. You’ll learn tons of time-saving tricks for your phone!
Asana has launched AI Studio, a no-code tool for building generative AI agents that can automate work planning tasks.
The company first unveiled its “AI teammate” plans in June, promising to enable customers to build autonomous agents that can perform tasks independently within the work management app.
On Tuesday, Asana said that the AI agent builder — renamed Asana AI Studio — is now out of beta and available to customers on its Enterprise and Enterprise+ plans in “early access.” There are two options for accessing AI Studio at this stage: a free plan with daily limits on usage, and a paid add-on. (Asana declined to provide specifics on pricing.)
Customers trialing AI Studio during the beta noted several advantages when deploying AI agents, said Paige Costello, head of AI at Asana. “The key benefits we’re seeing are the speed of decision-making and the overall acceleration of work and reduction in administrative and busy work,” she said.
“There is tremendous potential in AI-based agents to expedite workflow,” said Wayne Kurtzman, research vice president covering social, communities and collaboration at IDC. “The ability to deploy agents in the stream of work, where teams work, and without code becomes a powerful proposition.”
With the launch, Asana also announced additional features for AI Studio. These include a wider variety of potential AI agent actions, more control over smart workflow capabilities such as data access and costs, and an increase in the amount of context the AI agent can reference in its decision-making.
Users can also view a record of an AI agent’s actions and decisions. “You can actually dig into work that has happened and understand why the custom agent that you’ve built made a specific choice and undo the selection that it’s done,” said Costello.
Users can choose from four language models to power AI agents: Anthropic’s Claude 3.5 Sonnet and Claude 3 Haiku, and OpenAI’s GPT-4o and GPT-4o mini.
With AI agents able to complete tasks autonomously, the propensity for language models to “hallucinate” and provide inaccurate outputs could be a concern for businesses. Costello said there are safeguards in place to help reduce the likelihood of AI agents generating and acting on incorrect information, and argued those designing the AI- workflows are “in the driver’s seat.”
For example, a user can require an AI agent to seek human approval before carrying out actions deemed higher risk, such as sending an external email to a customer. “People are the decision makers –– they’re the ones ultimately accountable for work,” said Costello.
Adoption of AI agents is at an early stage for most organizations, but it’s accelerating, said Margo Visitacion, vice president and principal analyst at Forrester, covering application development and delivery. Successful deployments will require “experimentation, failing fast, and learning from those experiments,” she said.
“It takes the right level of oversight, focus on the problems you’re solving, and gathering feedback to ensure you’re using the right model that suits your needs,” said Visitacion.
Artificial Intelligence continues to dominate this week’s Gartner IT Symposium/Xpo, as well as the research firm’s annual predictions list.
“It is clear that no matter where we go, we cannot avoid the impact of AI,” Daryl Plummer, distinguished vice president analyst, chief of research and Gartner Fellow told attendees. “AI is evolving as human use of AI evolves. Before we reach the point where humans can no longer keep up, we must embrace how much better AI can make us.”
We waited three years for Apple to update the iPad mini, and what we got is more of the same — boosted with a much better processor. Apple’s iPad mini has consistently been positioned as either the most versatile, or the most underpowered tablet in the company’s lineup. That’s changed with the latest iteration, which remains small enough to take anywhere, but also becomes much more powerful than ever, thanks to a new A17 Pro chip.
Whole lotta processor
If you’ve used an iPad mini before, you know what you’re getting: a reliable, powerful, and eminently mobile device with a large display you can slip inside an inner coat pocket and use just about anywhere, except in the rain.
Available in two new colors (four in all, including space gray, starlight, purple, and blue), the chip is the real substance here. Apple promises a 30% faster CPU, a 25% increase in GPU performance, and double the machine learning performance of the last-generation iPad mini. Even in comparison to the last model, that processor means you really will feel the difference in terms of performance — and the internal memory has been beefed up to 8GB, which also makes a big difference.
Geekbench 6 tests on the review device generated single-core results of 2,520 and 6,440 on multi-core performance. In comparison, the iPad mini 6 with an A15 Bionic chip achieved 2,121 single-core, and 5,367 multi-core scores. While aggregate test results will be more accurate, my own testing confirms substantial improvement in the processor. What you are getting is an iPad that will (a) run Apple Intelligence, and (b) deliver the performance you require to run apps for the next few years.
That’s great for consumer users, but also important to education and enterprise deployments. This is, after all, an iPad that seems a good fit for real-world business applications such as retail, hospitality, warehousing, or distribution. You’ve probably already seen it used in one of those fields, so the processor upgrade will be a significant benefit for firms seeking to deploy AI solutions within their digital transformation efforts.
I recently learned that pilots sometimes fly with an iPad mini so they can use it to check flight maps and flight support apps while they are in the air. They (and their passengers) should be happy with the lack of lag and hardware-accelerated ray tracing they get while using those apps in flight.
The display remains the same — in this case, the well-received Liquid Retina system we saw last time around. You can expect a wide range of supported colors at 2255×1488-pixel resolution (at 326ppi) and a nice and bright 500 nits. What changes is you now also gain Wide Color P3 support and support for True Tone. (The latter uses advanced sensors to adjust the color and intensity of your display to match the ambient light, so images appear more natural.)
I’ve been testing the iPad mini for a few days and have not experienced any cases of so-called “jelly-scrolling,” when one side of the screen refreshes at a different rate than the other when scrolling up and down.
When it comes to most of the hardware, the music hasn’t changed. You’ll still find it an easy-to-hold device because it is light, thin, and small. Dimensions remain 7.7 x 5.3 x 0.25 inches. The weight is 0.65 pounds, same as the last generation. You get USB-C (though this supports data transfers at 10Gbs, twice as fast as before), Touch ID, and no headphone port.
Under-the-hood changes are all about networking — Wi-Fi 6E, 5G support, and Bluetooth 5.3. The cameras remain more or less the same, though images captured on the device use machine intelligence to optimize the results. One older image Apple Intelligence selected as my Home screen picture really pops thanks to the AI tweaks.
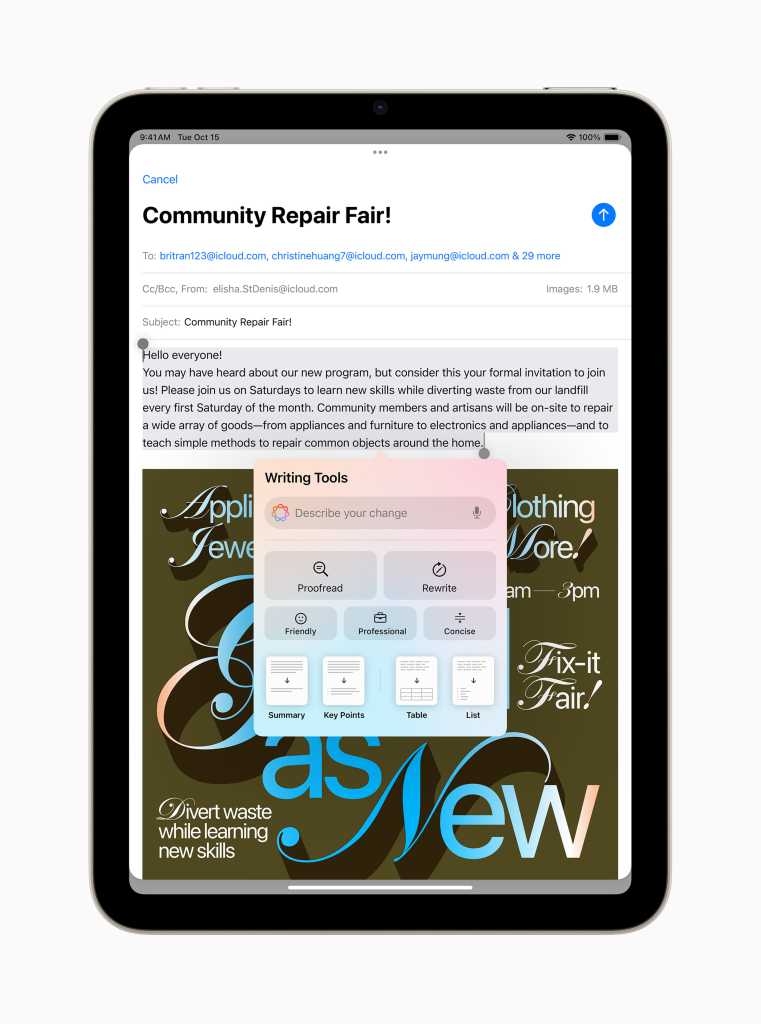
Good times, AI times
Now, for most mortals, Apple Intelligence remains something that’s nice to have, rather than something essential. That’s how it will remain until the first services under that moniker appear next week. On this device, one thing Apple Intelligence is already good at is summarizing emails and helping write better ones, while the Siri improvements in iOS 18.1 bode well for additional contextual intelligence expected to appear next year.
Given that Apple Intelligence isn’t available yet and won’t be available for some time in China or Europe, it’s too early to surmise the extent to which that will change the user experience. But even while that jury remains out, iPad Air continues to keep its promise to provide a good balance of mobility and usable display space. Its processor also gives third-party AI developers a platform on which to build other non-Apple AI-augmented experiences. That could be useful to some businesses. (And business and education users might appreciate that the camera takes excellent document scans.)
One complaint concerns the screen refresh rate. While other tablets have already jumped to 120Hz, the iPad mini remains confined to 60Hz. I don’t know if that decision is based on costs, heat dissipation, energy management, or parsimony, but I have seen enough people commenting on this to know that it’s something Apple will need to deal with in the future.
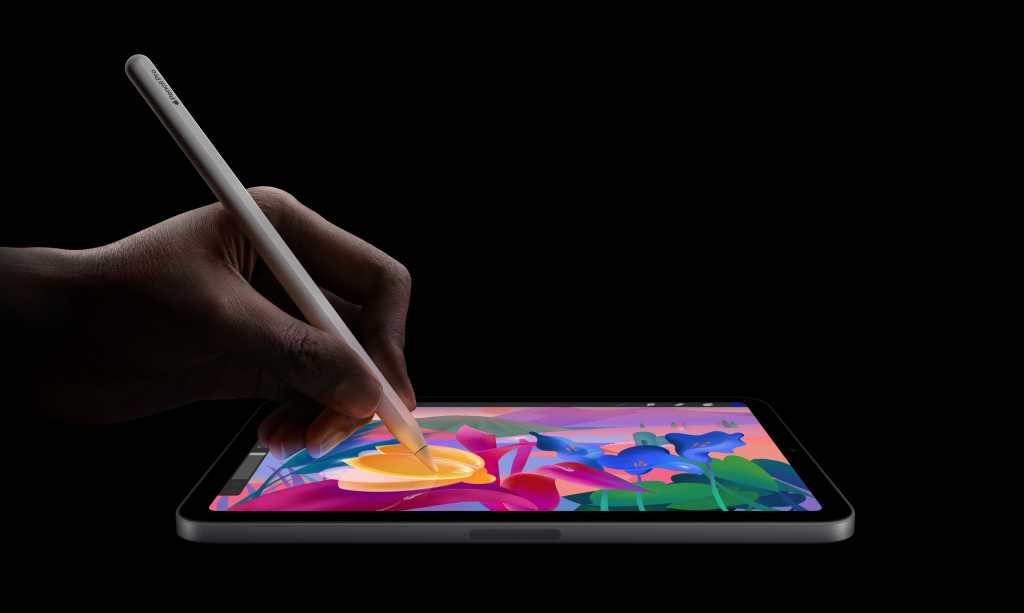
If you are using an Apple Pencil with your current iPad mini, I have bad news: the new model will not support any Apple Pencil other than the newish Apple Pencil Pro and the USB-C Apple Pencil. If you’ve been using a second-generation Apple Pencil, you’re out of luck. (First-generation pencil support in iPad mini disappeared with iPad mini 6.)
It is also interesting that Apple continues to avoid kitting out its iPad mini or standard iPad with the M-series chips found inside the iPad Air and iPad Pro. The decision makes it clear that Apple is ultimately using the built-in processor as its way to compete with itself, as no one else in the tablet market is really in its league. Want a more performant tablet? Apple has them, but not in the mini range.
Finally, when it comes to the built-in camera, you probably have a better camera in your smartphone than what’s here. It’s good enough, has been updated to deliver better, and Apple’s image intelligence software means it takes good pictures, if you want to do so with a tablet. It is more than suitable for video conferencing, of course.
What else to know
There is one more thing, the price. Just as in 2021, the entry-level model still costs $499 (Wi-Fi only, add $150 for the cellular model), but it now ships with 128GB of storage rather than 64GB; 256GB and 512GB models are also available. More storage is always a win, but don’t ignore that Apple Intelligence requires at least 4GB of that space for its own use.
Should you buy it?
I’ve used iPads since the beginning. Over that time, my preferences have kind of coalesced around the iPad Air, which I think provides a brilliant balance between power and affordability, and the iPad mini, which I rate highly for its inherent portability, but always deserved a little more power.
The move toboost internal storage and memory while pepping things up with an A17 Pro chip means the small device can handle most tasks; you probably won’t be using it extensively for video processing in the field or advanced image editing, but could use it for some of both of those tasks. You’ll also enjoy reading books, gaming, watching videos, or listening to music. (Apple’s audio teams really know how to create great soundscapes in these devices.)
The processor upgrade means that if you are using an iPad mini 6 or earlier, a move to this model makes sense — particularly if you want to explore what Apple Intelligence is all about. While it’s mostly the same, it is overall better, and if you’ve convinced yourself you have a solid reason to invest in a smaller tablet, the iPad mini 7 remains the best small tablet around.
Generative AI is on track to transform entry-level roles across industries, with 64% of leaders expecting these positions to evolve from creation to review and refinement of outputs within the next three years. The percentage of managers holding a similar view stood at 71%, according to new research from the Capgemini Research Institute.
The findings suggest the traditional model of junior employees manually creating content, data, or code is rapidly being replaced by generative AI, which can generate these outputs in a fraction of the time. As a result, employees in these positions will focus more on quality control, critical analysis, and ensuring AI outputs meet business standards, the report added.
The findings are based on Capgemini Research Institute’s May 2024 survey that involved 1,500 executives and 1,000 entry-level employees from 500 organizations with over $1 billion in revenue, to explore generative AI adoption.
The report revealed that employees expect genAI will manage an average of a third of their tasks (32%) within the next 12 months, indicating a potential productivity boost. This shift is expected to be felt most acutely in roles that traditionally involve manual content creation, data entry, or routine customer service tasks.
“Generative AI tools are becoming more adept at assisting with complex managerial tasks, which could challenge the status quo of organizational structure and ways of working,” Roshan Gya, CEO of Capgemini Invent and a member of the Group Executive Committee said in a press note. “This shift allows employees to focus on higher-value activities, unlocking new perspectives and challenging assumptions.”
Increased autonomy for junior employees
The widespread integration of AI into the workplace will not only change the nature of entry-level work but also grant more autonomy to junior employees.
According to the data, 52% of leaders and managers expect entry-level positions to gain greater independence as AI becomes more embedded in daily workflows. For example, in industries such as supply chain and logistics, AI will take on tasks like inventory management and order processing, allowing junior analysts to focus on strategic tasks and project management.
As AI continues to manage mundane tasks, junior employees will have more opportunities to make decisions that were previously the domain of higher-level staff. This will enable them to fast-track their careers and assume greater responsibilities early on, the report stated.
The report reveals that 51% of leaders believe AI will accelerate the career progression of entry-level employees. With AI automating routine functions, junior employees will gain exposure to more strategic elements of their roles, moving into management positions much faster than traditional career paths have allowed. AI will facilitate this shift by providing employees with the tools and data necessary to make informed decisions and take on supervisory roles.
“It should be noted that this shift depends on several factors: clarity on skills requirements at higher levels; the ability of junior employees to develop these skills (often tied to experience, which cannot be fast-tracked); and the availability of opportunities available for the shift,” the report pointed out.
It further added, “Organizations must prioritize building the skills and readiness of junior employees as part of a clear roadmap for employees’ journeys to people leadership or functional/technical leadership. This requires proactive steps around talent acquisition, development, skilling, and review and reward mechanisms.”
This transformation is already visible in fields such as marketing, customer service, and even technical domains like software development.
“We’re seeing AI take over foundational tasks in these sectors, and junior employees are becoming curators of AI work, rather than creators,” the report said.
With AI’s involvement, the proportion of managers within teams could expand from 44% to 53%, reflecting a broader move toward specialized roles that focus on managing AI-human collaborations.
Productivity gains, but upskilling gaps remain
The findings from the report suggest that while AI adoption promises significant productivity gains — potentially saving 18% of time for entry-level workers — there are concerns about the readiness of employees to leverage these tools.
Despite the optimism about AI’s role in career acceleration, the report highlights a significant gap: only 16% of employees feel they are receiving adequate training in AI-related skills from their organizations. This gap poses a major challenge for companies that want to fully harness the benefits of AI, especially at the entry level.
“Without the proper training and resources, employees won’t be able to maximize the potential of AI,” the report cautioned, urging organizations to prioritize formal training programs to ensure their teams are ready for the AI-driven future.
The path ahead
Despite the promise of genAI, adoption remains nascent. While 64% of workers already use genAI tools, only 20% use them daily, the report stated.
This gap between AI’s potential and actual usage underscores the need for clearer guidelines, comprehensive training, and better integration of AI tools into existing workflows. As organizations continue to explore AI’s capabilities, defining roles and responsibilities for human-AI collaboration will be key to ensuring accountability and cohesion across teams.
With 81% of leaders expecting new roles like AI ethics specialists and data curators to emerge, the landscape of entry-level work is on the verge of a significant transformation. The future of work, it seems, will be less about replacing human effort and more about enhancing it through strategic collaboration with AI.
Generative AI is on track to transform entry-level roles across industries, with 64% of leaders expecting these positions to evolve from creation to review and refinement of outputs within the next three years. The percentage of managers holding a similar view stood at 71%, according to new research from the Capgemini Research Institute.
The findings suggest the traditional model of junior employees manually creating content, data, or code is rapidly being replaced by generative AI, which can generate these outputs in a fraction of the time. As a result, employees in these positions will focus more on quality control, critical analysis, and ensuring AI outputs meet business standards, the report added.
The findings are based on Capgemini Research Institute’s May 2024 survey that involved 1,500 executives and 1,000 entry-level employees from 500 organizations with over $1 billion in revenue, to explore generative AI adoption.
The report revealed that employees expect gen AI will manage an average of a third of their tasks (32%) within the next 12 months, indicating a potential productivity boost. This shift is expected to be felt most acutely in roles that traditionally involve manual content creation, data entry, or routine customer service tasks.
“Generative AI tools are becoming more adept at assisting with complex managerial tasks, which could challenge the status quo of organizational structure and ways of working,” Roshan Gya, CEO of Capgemini Invent and a member of the Group Executive Committee said in a press note. “This shift allows employees to focus on higher-value activities, unlocking new perspectives and challenging assumptions.”
Increased autonomy for junior employees
The widespread integration of AI into the workplace will not only change the nature of entry-level work but also grant more autonomy to junior employees.
According to the data, 52% of leaders and managers expect entry-level positions to gain greater independence as AI becomes more embedded in daily workflows. For example, in industries such as supply chain and logistics, AI will take on tasks like inventory management and order processing, allowing junior analysts to focus on strategic tasks and project management.
As AI continues to manage mundane tasks, junior employees will have more opportunities to make decisions that were previously the domain of higher-level staff. This will enable them to fast-track their careers and assume greater responsibilities early on, the report stated.
The report reveals that 51% of leaders believe AI will accelerate the career progression of entry-level employees. With AI automating routine functions, junior employees will gain exposure to more strategic elements of their roles, moving into management positions much faster than traditional career paths have allowed. AI will facilitate this shift by providing employees with the tools and data necessary to make informed decisions and take on supervisory roles.
“It should be noted that this shift depends on several factors: clarity on skills requirements at higher levels; the ability of junior employees to develop these skills (often tied to experience, which cannot be fast-tracked); and the availability of opportunities available for the shift,” the report pointed out.
It further added that “Organizations must prioritize building the skills and readiness of junior employees as part of a clear roadmap for employees’ journeys to people leadership or functional/technical leadership. This requires proactive steps around talent acquisition, development, skilling, and review and reward mechanisms.”
This transformation is already visible in fields such as marketing, customer service, and even technical domains like software development.
“We’re seeing AI take over foundational tasks in these sectors, and junior employees are becoming curators of AI work, rather than creators,” the report said.
With AI’s involvement, the proportion of managers within teams could expand from 44% to 53%, reflecting a broader move toward specialized roles that focus on managing AI-human collaborations.
Productivity gains but upskilling gaps remain
The findings from the report suggest that while AI adoption promises significant productivity gains — potentially saving 18% of time for entry-level workers — there are concerns about the readiness of employees to leverage these tools.
Despite the optimism about AI’s role in career acceleration, the report highlights a significant gap: only 16% of employees feel they are receiving adequate training in AI-related skills from their organizations. This gap poses a major challenge for companies that want to fully harness the benefits of AI, especially at the entry level.
“Without the proper training and resources, employees won’t be able to maximize the potential of AI,” the report cautioned, urging organizations to prioritize formal training programs to ensure their teams are ready for the AI-driven future.
The path ahead
Despite the promise of Gen AI, adoption remains nascent. While 64% of workers already use Gen AI tools, the report stated that only 20% use them daily.
This gap between AI’s potential and actual usage underscores the need for clearer guidelines, comprehensive training, and better integration of AI tools into existing workflows. As organizations continue to explore AI’s capabilities, defining roles and responsibilities for human-AI collaboration will be key to ensuring accountability and cohesion across teams.
With 81% of leaders expecting new roles like AI ethics specialists and data curators to emerge, the landscape of entry-level work is on the verge of a significant transformation. The future of work, it seems, will be less about replacing human effort and more about enhancing it through strategic collaboration with AI.